From the creative fly tying mind of Lance Egan comes one of my favorite carp flies of all time. I’m not too sure what it’s supposed to imitate but for me, that’s true of many carp patterns. Most likely it represents a small crayfish… possibly a dragonfly nymph.
The bead chain eyes give it the perfect amount of weight to get down quickly to carp feeding on a shallow flat without the loud splash of lead. And when the eyes are positioned correctly, it rides hook up, preventing bottom snags.
Present it by leading the carp slightly and retrieve it very slowly into carp’s path. The take will be subtle. Watch for the turn of the carp’s head, set the hook, and hang on!
Egan’s Headstand
Hook: TMC 2457 #8
Thread: 6/0 Black
Tail: Red fox squirrel tail
Body: Medium to dark brown dubbing
Hackle: Brown rooster, palmered
Rib: Fine copper wire
Throat: Peacock sword
Legs: Sili-legs pumpkin – orange – black
Head: Bright orange dubbing
Eyes: Medium silver bead chain, positioned just behind the eye.
When it comes to fishing dry flies in the Smokies, particularly on the smaller streams, I am typically looking for two primary things in a pattern: It needs to be visible and it needs to be buoyant. Beyond that I can begin focusing on a few more details like color and size.
In general, trout in the Smokies don’t see heavy hatches of individual insects. Rather, they mostly see small quantities of a lot of different insects. So, if you can present the fly naturally and without spooking fish, most any all-purpose, “prospecting” fly pattern will do the trick. As mentioned above, if you can get a little more precise with size and color, your pattern will be that much more effective.
Matching size will require more observation of bugs on the water or simply having general knowledge of what should be hatching. The same two things can help with matching color but also having broad knowledge of how seasons impact color can put you ahead of the curve. With some exceptions, aquatic insects tend to blend in with their surroundings. So, in winter months when trees are bare, most of what hatches is dark. As foliage comes in, most of what hatches is brighter.
The Stimulator has long been a favorite fly pattern of Smoky Mountain anglers for all of the reasons mentioned above. Its buoyancy and light colored wing not only make it easy to see, but make it a perfect “indicator fly” when fishing a dropper. And if you mix and match sizes and colors, you could nearly fish a Stimulator 12 months out of the year!
The Stimulator was long thought to be the invention of well-known West Coast angler and fly shop owner, Randall Kaufmann. While Kaufmann is responsible for the modifications that made the fly most of us know today, the fly’s true originator is thought to be Paul Slattery, who tied a stonefly pattern called the Fluttering Stonefly to fish on the Musconetcong River in central New Jersey. This was in the early 1980’s and he soon renamed the fly after a New York City punk-rock band called The Stimulators.
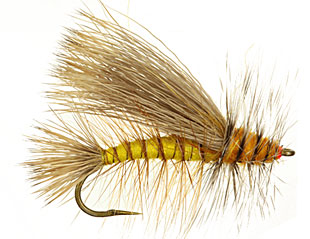
Golden Stonefly
In any case, the fly seems to have been created to imitate an adult stonefly, but it is also a good suggestion of a caddis and sometimes even a hopper. I most often fish it in yellow and in sizes #16 – 8. I think the smaller size makes a great imitation for the prolific Little Yellow Sally Stoneflies, and the larger sizes are good representations of the larger golden stones that hatch on summer evenings in the mountains. In the fall, I often fish a #10 Stimulator in orange to imitate the large ginger caddis.
Whether it is imitating anything or not, it catches fish and it floats well in heavier pocket water found throughout the mountains. It is one of the most popular dry flies ever invented for trout and can be found in most every fly shop in the country.
In the Smokies, we are mainly fishing faster, choppier water and often choose bushier, more heavily hackled dry fly patterns that float well. In that kind of water, trout don’t get much time to study the fly and their view tends to be distorted by those choppy currents, so the bushier flies tend to do the trick. Even when fishing pools in the Smokies, you usually have a defined feeding channel that will have at least a little chop to it. In those situations, a parachute style fly pattern is usally adequate to provide a slightly more realistic profile.
But in flatter water like you commonly see on tailwaters like the Clinch, particularly weeks into a heavy hatch, an even more realistic profile is necessary. Trout routinely refuse parachute style flies and probably wouldn’t even consider a vertically hackled Catskill style dry fly.
This problem isn’t new to fly fishers. In the 1930’s, Fran Betters developed the Haystack to fool trout in slow moving spring creeks. It consisted of a deer hair wing and tail and no hackle, allowing for a lower riding fly with a much more realistic profile. Al Caucci and Ed Natasi introduced the Comparadun, a variation of the Haystack, in their 1972 book, Comparahatch. The pattern is essentially the same but they were able to use more modern microfibbets to create a longer, slimmer, more durable split tail that aided in floatation.
In the mid 1980’s, Craig Matthews and John Juracek took the Comparadun a step further and replaced the split microfibbet tails with a piece of antron or zelon. It essentially turned the fly into an emerger, with the antron or zelon “tail” suggesting the trailing shuck of an emerging mayfly. Of course, in any of the patterns described above, the body, wing, and tail/shuck colors can be altered to imitate different insects.
I routinely fish the split tail and the trailing shuck versions, usually during a sulphur or BWO hatch. And again, I am usually fishing them on the Clinch or possibly in a slow pool in the mountains. They just don’t float well enough to fish them in faster riffles and pocket water. But on a slow glide on the Clinch, they can be deadly!
Sulphur Comparadun
Hook: TMC 100 (or equivalent) #16-18
Thread: 8/0 pale yellow
Tail: Light dun microfibbets ( or replace microfibbets with small tuft of brown antron for trailing shuck version)
Body: Pale yellow dry fly dubbing
Wing: Coasatal deer hair
I almost always fish with two flies when I’m trout fishing. There are just so many advantages to it. Beside the obvious advantage of potentially offering two fly choices to the trout, it provides you the opportunity to simultaneously present a fly in two different feeding columns. Below, I’m going to talk about some of those strategies as well as a few different ways to rig a dropper system. As a bonus, you get to enjoy some of my horrific artwork!
Dry Fly / Dropper
This is the two-fly method with which many fly fishermen are most familiar. It seems that even less experienced fishermen will tell you this is how their guide rigged them up when they were fishing out west during hopper season. When you rig like this, you are typically tying on a larger, or at least more visible, dry fly and attaching a smaller nymph off the back of that dry fly. You’re covering the top of the water with the dry fly and you’re covering usually the middle water column (sometimes the bottom) with the nymph. The dry fly serves as sort of an edible strike indicator for the nymph.
I typically rig this by tying my dry fly directly to the main leader and tippet. I’ll then take probably 18”-24” of tippet material and tie one end to the nymph, and the other to the bend of the hook on the dry fly. There are certainly a lot of variables, such as water depth or where you think the fish might be feeding, that determine how far apart you put the two flies, but the amount mentioned above is a pretty good “default setting.” I like to use a clinch knot to connect to the bend of the hook, but whatever knot you usually use to tie a fly on should work fine.
You want to make sure that the flies you select for this set-up compliment each other and are appropriate for the type of water you’re fishing. For example, a small parachute dry fly may not support the weight of a large, heavily weighted nymph. Parachute type patterns will easily support the weight of smaller, lighter nymphs, particularly in slower water. So, a #14 Parachute Adams with a #18 Zebra Midge dropper would be great for a tailwater or maybe a slower run or pool in the mountains. A #14 Parachute Adams with a #8 weighted Tellico nymph, fished in faster water is going to be trouble. Heavily hackled, bushy dry flies or foam dry flies are better choices when fishing in faster water or with heavier nymphs.
With that in mind, know that this method may not be suitable for every situation. For instance, if you need to get a nymph deep, particularly in a faster run, you’re going to need a lot of weight and using a dry fly–dropper rig is not going to be effective. You’re better off using traditional nymphing techniques for that. But for fishing hatch scenarios where fish are actively feeding on and just below the surface, or for fishing to opportunistic feeders in shallower pocket water, it’s pretty tough to beat.
I also like to fish this same rig with two dry fly flies. On many occasions, I’ve found myself in a situation where I have trouble seeing my dry fly – usually when trying to imitate something small or dark like a midge, Trico, or BWO. In those situations, I’ll often tie on a larger, more visible dry fly with the smaller, darker dry fly tied about 18” off the back. Sometimes, having the more visible fly as reference allows me to actually see the smaller fly. But if I still can’t see the smaller one, I know to set the hook if I see a rise anywhere within 18” of the visible fly.
Two Nymphs or Wet Flies
Just like the dry fly-dropper rig above, fishing with two nymphs or wets allows you to cover two different feeding columns. Only now, you’re typically covering the middle column and the bottom. I think another advantage with a two nymph rig is they tend to balance each other out and drift better.
There are a few different ways to rig for this and there are numerous strategies for fly selection and placement. If I have a nymph pattern that the fish are really after, I will sometimes fish two of the exact same fly. There have even been a few occasions when I’ve caught two fish at once! But usually I’m searching and I’m trying to provide the fish with options, so I’ll most often have two different fly patterns.
Keep in mind that (most of the time) your lowest fly on the rig will be fished near the bottom while the higher fly will be fished more in the middle column. I try to select and position flies with that in mind. For example, it’s far less likely to find a stonefly in the middle of the water column. They’re going to be found near the stream bottom, so logically, I want my stonefly nymph to be the bottom fly of my two fly rig. On the other hand, an emerging mayfly is more likely to be found in the middle feeding column. So, a soft hackle wet fly would probably be most effective as the top fly on my nymph rig.
You can rig like this with totally different flies or you may decide to stay in the same “family.” If you’re in the middle of or expecting, say, a caddis hatch, you may rig with a caddis emerger as your top fly and a caddis larva as your bottom fly. I’ve also had a lot of success choosing one nymph to act purely as an attractor. I may tie on a larger or brighter nymph as my top fly and a smaller or subtler nymph as my bottom one. I think that very often, the brighter or bigger nymph gets their attention, but they eat the subtler nymph below it. I tend to fish the nymphs a little closer together in these situations.
You can rig a pair of nymphs the same way we mentioned above, by tying one directly off the hook bend of the other – referred to as the in-line method. This is probably the easiest way to rig and fish two nymphs. But some don’t like this method because they don’t think it allows the top fly to drift freely.
A common way to rig two nymphs that will allow the top fly to drift more freely, is to use a blood knot to attach a section of tippet to the end of your leader. When tying the knot, take care to leave one long tag end, to which you will tie the top fly. The bottom fly will be attached to the end of the new tippet section. This definitely allows the top fly to have more movement and it puts you in more direct contact with both nymphs. Though for me, this method results in a lot more tangles so I only use it for specific scenarios.
You can also rig quite similarly using a tippet ring (discussed in another article in this newsletter). With a tippet ring attached to the end of your leader, you tie one shorter piece of tippet to the ring, to which you will tie your top fly. And you tie a separate, longer piece of tippet to the ring, to which you’ll tie your bottom fly. This is a pretty simple way to do things but will also likely result in a few more tangles than the in-line method.
These are just examples of a few of the more common methods for fishing and rigging multiple flies. Play around with it and find what combos and techniques work best for you. Never be afraid to experiment!
Probably 20 years ago, I was fishing the Clinch River with a buddy during the sulfur hatch. I won’t get into what has happened to that hatch, but back then, it was epic. Sulfurs would come off by the thousands for 4-6 hours a day for about 3 months. We would drive down from Kentucky to fish it and on most trips, we would both steadily catch fish, many topping 20”.
On this particular trip, the bugs were coming off as good as they ever had, the water was boiling with rises, but we were both getting blanked! We were both going through every type of sulfur dry, emerger, and nymph in the box, all with the same result. Frustration got the best of both of us and we headed to the bank for a smoke, a bad habit we both enjoyed back then. While staring at the river and scratching our heads, it hit us both at the same time as we simultaneously exclaimed, “They’re eating caddis!”
Caddisflies tend to emerge quickly and almost explode off the water. When a trout feeds on one, it will frequently chase it to the top to eat it before it gets away. Sometimes the momentum will cause the fish to come completely out of the water, but at the least, results in a very distinct, splashy rise – not like the delicate sipping rise to a mayfly. Once we stepped away from the river and watched, we both noticed it.
We went back to the water and began looking more closely. Sure enough, there were caddis hatching, too. There was probably one caddis hatching for every 100 sulfurs, but for whatever reason, the trout were keyed in on the caddis. It’s what is referred to as a “masking hatch.” We both switched to the appropriate caddis pattern and were immediately into fish!
That’s not the only time something like that has happened, and each occurrence has trained me to always pay attention and sometimes try to look past the obvious. Here are a few things I’ve learned along the way that may help you solve a hatch riddle sometime.
First, we have to address the basics. If you see fish rising and have a pretty good idea what they’re eating but you’re fly is being ignored, check to see that your fly is the same size as the naturals. Also be certain that your tippet is not too large and that you’re getting a good drift. Presentation is most often the culprit when your fly is being ignored. Next, make certain that the color is a close match to the natural. If you’re fishing a bushy pattern, you might try a more subtle pattern like a Comparadun. If that’s not working, try an emerger fished just under the surface or in the film.
Fish Rise
Still not catching them? Take a break and watch the water. You may be able to tell something from the rise rings as I described above. If you don’t learn anything from that, try to find a fish that is rising steadily and watch him. He’s probably feeding in rhythm, like every 10 seconds. Watch his spot and try to time his rises. When you have that down pretty close, try to see what he eats. You should be able to tell if it’s the same kind of bug you’re seeing in the air, or at the very least, whether he’s eating something on or just below the surface. It’s almost like detective work. You sometimes have to go through the process of eliminating suspects before you can zero in on your man!
If fish are actively rising but you don’t see any bugs in the air, check the water. Try to position yourself at the bottom of a feeding lane (downstream of where the fish are feeding) and watch the surface of the water (and just beneath) for drifting bugs. Holding a fine mesh net in the current is a great way to collect what’s coming down the channel, but if you don’t have one, your eyeballs will do just fine. If you see some insects, capture one and try to match it with a fly pattern.
Hatches are puzzles and that’s one of the things that makes them fun. Sometimes you solve it right away, sometimes it takes awhile. Just remember that while the fly pattern is a big part of the equation, it’s not the only one. As mentioned above, presentation is huge. In addition to your technique, a smaller tippet and/or a longer overall leader may be the solution. Also consider your approach.
While I typically like to cast upstream to fish so that I can stay behind them, they will sometimes shy away from your fly in slow runs if they see your line or leader. I will sometimes try to get above fish in slow runs and cast down to them so they are sure to see the fly first. You have to land your cast short of them with slack in the line, and feed slack to enable the fly to naturally drift to them. This is a challenging presentation and it is critical that you carefully position yourself out of the trout’s line of vision.
Again, it’s a puzzle and there’s not one universal solution to every challenge.
Pay attention to your technique and everything what you’re doing (or not doing). Most important, pay attention to the fish. They’ll usually tell you what to do!
Learn more about Smoky Mountain hatches and flies in my hatch guide.
In the last ten years or so, the term “Euro Nymphing” or “Czech Nymphing” has become more and more common, and is often billed as a revolutionary style of fishing. Basically, it is just nymph fishing without a strike indicator. It’s akin to what many for years have referred to as short-line or straight-line nymphing. Others refer to it as high-sticking. Or the old mountain fishermen around here just call it nymphing, because it’s how they’ve fished for decades and decades.
There is not a lot written about the history of fly fishing in the Southern Appalachians, and most of the techniques were just handed down generation to generation. I’ve had the pleasure and benefit of learning from many of these “old timers,” so when I first heard about this revolutionary style of fishing, I had to chuckle. There really is nothing new under the sun.
There are a few subtle differences in European nymphing techniques and what I learned to do. But what any trend will bring to the industry, no matter how long the method has been around, is the availability of new and better tools and equipment to perform the new trend. In this method of nymphing, you are really trying to keep your fly right on the stream bottom, which of course results in a lot more snags. Traditional jig hooks are great for this because they ride hook up, but until recently, haven’t been available in appropriate sizes and weights for fly fishermen.
Now there are a number of micro-jig hooks available that accommodate a special slotted tungsten bead. They are perfect for fly tying and I have begun tying a lot of my favorite nymph patterns on them. However, one of the first flies I tied on them, The Frenchie, is a pattern that did come from the “Euro-nymphing scene” and it has proven to be an effective trout pattern on a number of different waters.
It’s basically a Bead Head Pheasant Tail with a “hot spot” of bright dubbing at the head. The original pattern uses a bright pink dubbing for the hot spot, and that seems to work very well for stocked trout and even wild trout at times. In general though, I tend to have more success with wild trout using slightly more natural colors like yellow or green.
Again, it’s greatest value is that it has plenty of weight and rides hook up, so you can get it down deep with far fewer bottom snags. Pick some up and give them a try next time you’re out. And if you’re a fly tyer, I’d recommend trying some other favorite nymphs like Pheasant Tails and Hare’s Ears on these hooks.
Learn more about Smoky Mountain hatches and flies in my hatch guide.
We often hear about the importance of fishing terrestrials in the summer months. Out west, the conversation usually focuses on hoppers. Around here, we talk more about beetles, ants, and inchworms. Regardless, there are a number of land-based insects from beetles, ants and hoppers to cicadas, bees and black flies that find their way into the water during the summer months.
Just the other day on a guide trip, a customer caught a brook trout that had a mouth full of small beetles. The fish had obviously been very recently gorging on them, but if you studied the surface of the water in that pool, you’d have a tough time finding a single beetle on the water. You would also be challenged to see ants, inchworms, or any other terrestrial. However, if you used a bug seine in that same pool, you would get an entirely different picture.
The fact is these land-based insects are not particularly good swimmers. Most of them, particularly ants, beetles and inchworms, briefly attempt to swim on the surface of the water but soon are caught by currents and swept below the surface. But nearly every fisherman who fishes terrestrials, fishes them on the surface… and for good reason. Nearly every fly shop or fly manufacturer almost exclusively sells topwater terrestrial patterns. And most of these are constructed of foam or some other highly buoyant material to make the fly ride high on the water.
While you can certainly catch plenty of trout on these patterns and have a blast doing it, you are missing out on A LOT of fish. If you are a fly tier, try tying a few ants with a dubbed body and a hen feather rather than foam and hackle from a rooster neck. Tie some beetles without the high-vis sighter on the back and instead add a few wraps of lead wire. If you don’t tie flies, place a split shot above your favorite terrestrial pattern next time you go fishing.
A great way to fish them in pocket water is with a straight-line nymphing technique, allowing them to swing at the end of the drift. In pools, fish them a few feet under a strike indicator. Or tie on one of those big, buoyant foam hoppers and drop a submerged beetle or ant about 15” off the back. I probably use this method more than any other.
Learn more about Smoky Mountain hatches and flies in my hatch guide.
I could write thousands and thousands of tortured words on how to nymph fish. There are countless methods and variables that can be determined by anything from water conditions to the type of nymph you are trying to imitate. Needless to say, it’s a little more than we can chew in a newsletter article but consider this an introduction to what I like to call active nymphing.
I differentiate it with the word “active” because mostly, we are taught to fish our nymph(s) on a dead drift. In other words, we try to get our nymph to drift at the same speed as the current, usually under a strike indicator, with no motion or “action” at all. In many situations, this is a highly effective method for catching trout and one that definitely shouldn’t be abandoned. But there are some situations when putting a little movement in the fly, “little” being the key word, may produce a few more fish.
If you’ve spent much time fishing nymphs, this has probably happened to you at some point. You dead-drift your nymph(s) under a strike indicator multiple times through a great run with no results. When you quit paying attention to do something else (probably change flies), the line and nymph(s) straightens downstream, dragging in the current, and a fish hits it.
Nymphs will sometimes deliberately “drift” to other parts of the stream in a sort of migration. Other times, nymphs may unintentionally become dislodged from a rock and find themselves drifting down the stream. In either case, they are most often not particularly good swimmers, and are basically at the mercy of the current. Your dead-drift nymphing technique is primarily designed to replicate common scenarios like this. However, some nymphs, like the Isonychias mentioned in the other article in this newsletter, ARE good swimmers, and they don’t drift helplessly with the current. Caddis especially tend to be good swimmers.
Soft Hackle Pheasant Tail
And at certain times, such as when it’s time to hatch, even poor swimming nymphs will uses gases to “propel” themselves through the water column to reach the surface. These nymphs are often referred to as emergers, and during these times, that upward, emerging motion of the nymph is often what triggers the fish to strike. So, that fish you caught “by accident” when you let your line get tight and drag behind you may not have been such a fluke. When your drift ended and the line straightened, your nymph “swung” from the stream bottom to the surface, likely resembling an emerging nymph. The trick now, is to replicate that how and when you want to, rather than by accident when you’re not paying attention.
The best way to get started with this technique is by finding a good stretch of pocket water or a nice riffle with some deeper seams and cuts. With faster current, you’ll be able to get closer to the fish and employ a high-sticking method. Use a longer rod, probably 8-9’, and use a leader approximately the same length as the rod. Tie on a generic, all-purpose soft-hackle pattern, like a soft-hackle Pheasant Tail or Hares Ear, and put a small split shot about 8” above it. Forget the strike indicator.
In a smaller pocket, keep just a couple of feet of fly line out past the rod tip, and make a short cast up and across to the top of the pocket. You should be slightly more than a rod length away from your target, preferably with a faster current between you and the target (this will help to conceal you from the fish). Keep your rod tip up and out by extending your arm, and try to maintain an approximately 90-degree angle between the line and rod. By keeping your rod tip up, you can keep most of the leader off the water. If you want the nymph to go a little deeper, drop your rod a little lower. It depends on the depth of the water.
Move the rod with the drift at the pace of the current to maintain the 90-degree angle, and allow the drift to continue in front of and slightly below you. You may get a strike during this portion of the drift. If so, you’ll probably feel it since you have most of the slack out of your line, but keep a close eye on your leader. It will tighten if a fish strikes and be another cue for you to set the hook. When you reach the end of the drift (bottom of the pocket), quit moving the rod with the drift. This will force the fly to swing from the bottom to the surface. If the fish hits during this portion of the drift, you will likely feel a very hard tug.
You can use this same method when fishing a bigger pocket or a longer seam in a riffle. You may just be using slightly more line and have a little longer drift. You may also choose to try one more technique on these longer drifts. Do everything as described above, but when the fly and line are passing in front of you, give your wrist 3 or 4 intermittent, slight upward twitches. This will allow the fly to “jump” or “pulse” in the current. Keep in mind that you want those wrist twitches to be very slight. Quickly and aggressively “pulling” the fly from the bottom to top will not look natural.
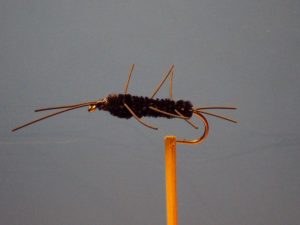
Girdle Bug
I suggested using a soft-hackle fly for this technique, mainly because the design of the fly lends itself well to the motion-based presentation, but I fish a variety of nymphs in this fashion. Definitely give it a try with your favorite caddis nymphs and emergers. And next time that water is a little high and stained from rain, give this a try with a dark Wooly Bugger or a dark, rubber-legged nymph like a Girdle Bug. You might be surprised at what you find!
More visible leaders with colored butt and mid sections can make this method of fishing much easier. They help a little with strike detection but mostly, they help you see and track the leader and better gauge the depth of the fly. I make leaders specifically for these short-line techniques and they are available for purchase here.
The Smoky Mountains are known for receiving large amounts of rain in a season and when it comes in bunches, the result can be swollen, rough, intimidating, and dangerous streams and rivers. Good and bad things occur when the water rises in mountain streams. On the down side, the streams become much more dangerous and sometimes impossible to wade. The faster current also makes it more difficult to control your drift. On the up side, a lot of food gets churned up in the stream, and that factor, combined with a level of comfort and security in stained water, often results in more reckless feeding by some of the bigger trout on the block. There are brown trout exceeding 20” in many mountain streams that don’t get caught often, but when they do, it’s usually when the water is up and off color.
The stream is going to look completely different under these conditions and it will help if you have intimate familiarity with the stream under normal flows. Regardless of how well you know the water, always use extreme caution under these conditions and don’t try any heroic stream crossings. One wrong step can quickly get you in big trouble! In fact, it’s not a bad idea to wear a life vest when fishing under these conditions. Better safe than sorry!
Forget about finesse. You’re not going to coax rainbows to #16 dry flies with delicate casts. Bring a long rod for a heavier line – maybe a 9’ 6 weight – and plan on chucking large, heavy nymphs with a rosary of split shot and no strike indicator. Casting is going to simply involve one flip behind you, wait for the tug on the rod tip, and chuck it forward with an open loop. Long casts are not necessary and will be less effective.
Instead, wade the edges and look for slower seams on the edge of fast currents and eddies behind rocks. Position yourself as close to the feeding zone as you safely can and use the length of the rod to reach and hold your flies in position. Keep the rod tip up and try to keep as much of the fly line off the water as possible, allowing for a much slower, more controlled drift. Follow the flies with the rod tip as they drift through the feeding lane and keep an eye on the fly line between the rod tip and water. You may feel a strike since you’re working with such a short line but most likely you’ll determine the strike when you see the fly line pull down or hesitate. If anything suspicious like this occurs, set the hook! With practice you’ll soon be able to differentiate between fish and rocks.
Don’t expect to catch large quantities of fish under these circumstances. It will be tough fishing to say the least. But if you stick with it, the rewards can be enormous!
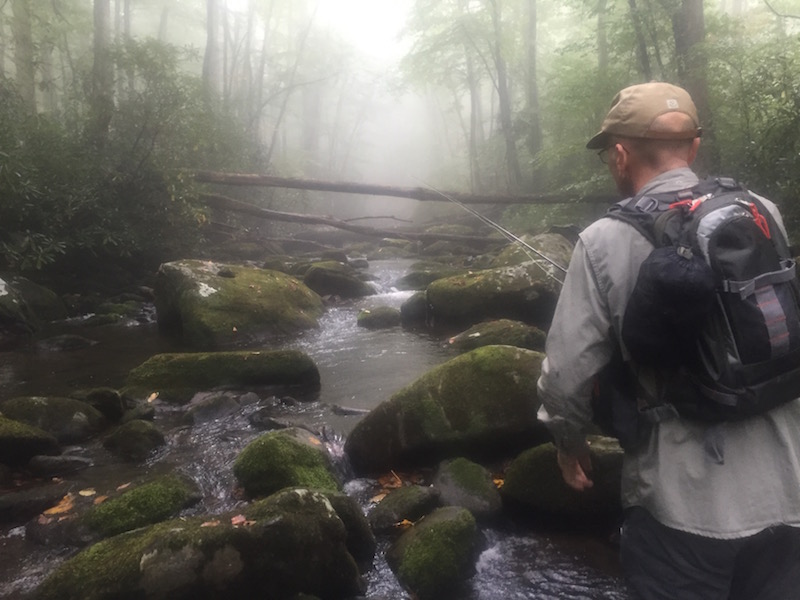
As many of you know, I spend nearly 200 days a year fishing and guiding on small mountain streams in the Smoky Mountains where creel surveys indicate that approximately 90% of (unguided) fishermen never catch a fish. Meanwhile, the 10% who do catch fish tend to catch A LOT of them. When fishing small streams, it’s a fine line between getting skunked and catching 50, and most of the time, the difference isn’t what’s in your fly box. In the Smokies and other similar small mountain streams, approach and presentation is the name of the game and to have success, you may need to adjust a few of your techniques. Listed below are 10 tips that may make your next small stream fishing trip more productive.
Dress for Success: As simple as it sounds, one of the biggest keys to being successful is not spooking the fish. There are a number of ways you can spook a trout but it all starts with what you wear. Leave the coral casting shirts at home. Instead, dress in earth tones like olive, tan, and grey. You don’t need to be a fly fishing commando with face paint and twigs in your hat but you do need to blend in.
This doesn’t matter as much on big, open rivers because you’re usually casting farther and your backdrop is the sky. On small mountain streams, you’re closer to the fish and your backdrop is usually trees, bushes, and rocks. Brighter colors stand out against that backdrop and allow the trout to more easily detect your movement.
Wade Quietly: Think Great Blue Heron and not Labrador Retriever when you’re moving through the stream. Step slowly, quietly, and try not to drag your legs through the water. Again, you’re closer to the fish in these streams and the fish are going to be sensitive to splashes and rocks scraping together. For this same reason, I don’t encourage wearing studded wading boots on these streams.
Move Upstream: Trout are going to be facing upstream watching a current for food. By moving upstream, you will be staying behind the fish making it more difficult for it to detect you.
Use Things Like Boulders to Hide Behind
Stay Low: A trout has a cone of vision that allows it to see things above it. The closer and higher up you are, the more the fish will be able to visually detect your movements. As before, you don’t have to be a fly fishing commando and belly crawl from spot to spot. Just try to crouch more when approaching a run and take advantage of natural barriers. For example, if there’s a boulder in the water, stay behind it rather than standing on it.
Read the Water: Trout won’t be just anywhere in the stream. Aimlessly casting your fly around the creek is not only unproductive, you risk spooking the good spots by throwing your line across them. Most of what you’ll find in small mountain streams is pocket water, which is just faster water interspersed with large rocks. Almost everywhere a current breaks over or around a rock creates a holding area for a trout, usually on the edges of the current and directly above and below the rock.
Look Before You Leap
Reading water becomes very instinctive with a little experience, but at first, you’ll have to think about it a little more. Look at each spot you’re approaching and consider that trout need three basic things: food, cover, and comfort. Food is typically going to be concentrated more in the currents rather than in still water. Cover is typically going to be found in deeper water and/or under things like rocks. Comfort is going to be found in places that don’t stress the fish, like slower currents rather than turbulent white water, or shade rather than sun on a bright, warm day.
Position First, Cast Second: Making a good presentation is the other biggest key to success on small streams, and one of the most challenging. Many anglers mistakenly stay too far back from their target and cast way too much line. In smaller mountain streams, you typically have a fairly large volume of water moving downhill through a narrow area. Everyplace the water breaks around a rock creates a velocity change, resulting in dozens of different current speeds. Making long casts puts line across all of these currents and creates drag on the fly. Drag on the fly means you don’t catch fish.
Attempting to overcome this exclusively by mending line is often impractical not only because of the numerous varied currents, but you simply don’t have time to do that much mending when casting to such small target areas. Your best course of action in pocket water is usually to get closer to the target where you can keep most of the line and leader off the water, often eliminating the need to mend altogether. At the very least, it will be easier to mend a short length of line on one current than a long length of line on five currents.
To get closer and keep from spooking fish, the idea is to keep something between you and the fish, like a boulder or simply a fast current. If you want to drift a fly on the inside edge of a current, you’re going to approach from the lower outside of the current, using that current to conceal you from the fish on the other side. Try to get close enough to use the length of your arm and rod to reach across the current and keep line completely off of the faster water. A longer rod will be beneficial because it’s going to give you more reach, allowing you to stay back a little farther. Of course, utilizing steps 1-4 are critical to making this work.
As you move up the stream, you’re constantly repositioning yourself for the next spot. Sometimes you’re repositioning yourself within the same pocket by fishing the near current first, moving closer, then fishing the far current. Remember, it has nothing to do with how far you can cast. Rather, it’s where you need to be to control line for the best drift. In pocket water, I’d estimate that 80% of the fish I catch are with less than 4’ of fly line past the rod tip.
When you come to a bigger, slower pool, you may not be able to get as close because you don’t have the faster currents to hide you. You also don’t have the faster currents to screw up your drift. Stay back and make slightly longer casts here. Just be careful not to make long casts to the head of the pool before fishing the tail or you can spook half the fish by lining them. Everything gets broken into pieces here. Whatever you’re going to spook first, fish first.
Minimize False Casting: Or just don’t do it at all. Most of the time when fishing small streams, you’re making very short casts, and in pocket water you’re often using a fixed amount of line. Repeated false casting is unnecessary and is movement above the fish. Wild mountain trout are in the middle of the food chain and they typically associate movement above them with a kingfisher or heron swooping down to eat them.
Position Carefully and Use a Longer Rod for Reach
Use a Longer Rod: There’s a common misconception that you need to have a short rod to fish small streams to stay out of the trees. Again, the idea here is not to make the longest cast possible up the stream without hanging a tree limb. You want to move closer, make short casts, and reach to keep line off of currents. A longer rod will better allow you to do that and I like to fish as long a rod as I can get away with. In the tiniest, rhododendron-choked mountain streams, that may only be 7’, but for typical mountain streams in the Smokies, it’s 8 ½’ – 9’. And yes, even longer tenkara rods can be highly effective for fishing this type of water.
Accuracy is Everything: All of the best small stream fly fishermen I can think of have two things in common. They know exactly where to position themselves before making a cast, and they are great casters. Unfortunately, great casting is often associated with double-hauling 110’ of line, and that’s hardly what I’m talking about. These fishermen aren’t making long casts, but can put the fly exactly where they want it the first time, the second time, and every time. In pocket water, if your first two casts are off target and/or drag a little bit, you still might catch a fish on the third cast, but you’ve probably already spooked the big fish of the hole.
If you’re not one to practice casting in the backyard, you should be. If you are, don’t just try to cast it as far as you can. Instead, practice with 20’ of line and less and try to hit a small target. Try to do it with an overhead cast off both sides of your body. Try to do it side arm. Try to do it with a roll or circle cast. You’ll find that the more you practice off the water, the “luckier” you’ll be on the water.
Keep Moving: In small streams, especially in pocket water, you’re going to catch more fish by covering more stream. Identify the likely spots in a pocket or run, put a half dozen drifts in each spot and catch your fish. If you miss a couple of strikes, put a few more drifts through and move on. If you don’t get a strike, don’t spend an hour there changing flies until you do. Move on. This doesn’t mean speed fish the stream, as you still need to be methodical in your approach. But when you get good at reading water, positioning and casting accuracy, you’ll be able to cover the water quickly and efficiently.

 The Stimulator was long thought to be the invention of well-known West Coast angler and fly shop owner, Randall Kaufmann. While Kaufmann is responsible for the modifications that made the fly most of us know today, the fly’s true originator is thought to be Paul Slattery, who tied a stonefly pattern called the Fluttering Stonefly to fish on the Musconetcong River in central New Jersey. This was in the early 1980’s and he soon renamed the fly after a New York City punk-rock band called The Stimulators.
 In the Smokies, we are mainly fishing faster, choppier water and often choose bushier, more heavily hackled dry fly patterns that float well. In that kind of water, trout don’t get much time to study the fly and their view tends to be distorted by those choppy currents, so the bushier flies tend to do the trick. Even when fishing pools in the Smokies, you usually have a defined feeding channel that will have at least a little chop to it. In those situations, a parachute style fly pattern is usally adequate to provide a slightly more realistic profile.
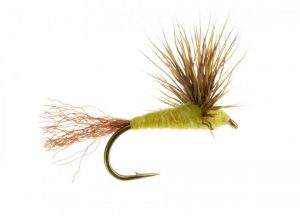 In the mid 1980’s, Craig Matthews and John Juracek took the Comparadun a step further and replaced the split microfibbet tails with a piece of antron or zelon. It essentially turned the fly into an emerger, with the antron or zelon “tail” suggesting the trailing shuck of an emerging mayfly. Of course, in any of the patterns described above, the body, wing, and tail/shuck colors can be altered to imitate different insects.
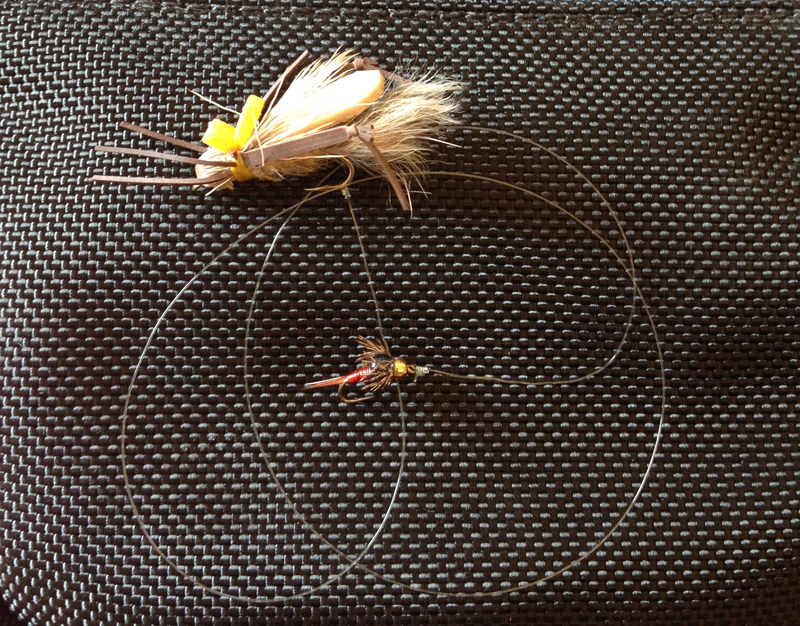 I almost always fish with two flies when I’m trout fishing. There are just so many advantages to it. Beside the obvious advantage of potentially offering two fly choices to the trout, it provides you the opportunity to simultaneously present a fly in two different feeding columns. Below, I’m going to talk about some of those strategies as well as a few different ways to rig a dropper system. As a bonus, you get to enjoy some of my horrific artwork!
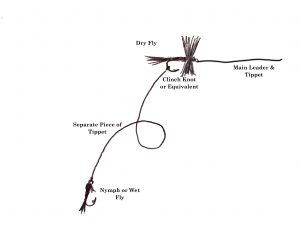 I typically rig this by tying my dry fly directly to the main leader and tippet. I’ll then take probably 18”-24” of tippet material and tie one end to the nymph, and the other to the bend of the hook on the dry fly. There are certainly a lot of variables, such as water depth or where you think the fish might be feeding, that determine how far apart you put the two flies, but the amount mentioned above is a pretty good “default setting.” I like to use a clinch knot to connect to the bend of the hook, but whatever knot you usually use to tie a fly on should work fine.
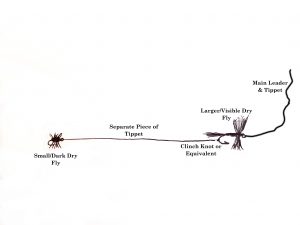 With that in mind, know that this method may not be suitable for every situation. For instance, if you need to get a nymph deep, particularly in a faster run, you’re going to need a lot of weight and using a dry fly–dropper rig is not going to be effective. You’re better off using traditional nymphing techniques for that. But for fishing hatch scenarios where fish are actively feeding on and just below the surface, or for fishing to opportunistic feeders in shallower pocket water, it’s pretty tough to beat.
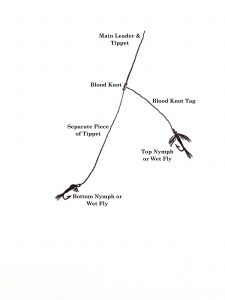 There are a few different ways to rig for this and there are numerous strategies for fly selection and placement. If I have a nymph pattern that the fish are really after, I will sometimes fish two of the exact same fly. There have even been a few occasions when I’ve caught two fish at once! But usually I’m searching and I’m trying to provide the fish with options, so I’ll most often have two different fly patterns.
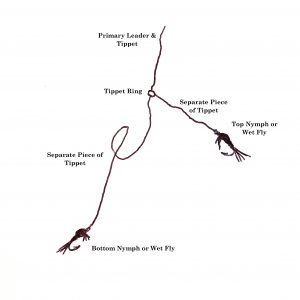 A common way to rig two nymphs that will allow the top fly to drift more freely, is to use a blood knot to attach a section of tippet to the end of your leader. When tying the knot, take care to leave one long tag end, to which you will tie the top fly. The bottom fly will be attached to the end of the new tippet section. This definitely allows the top fly to have more movement and it puts you in more direct contact with both nymphs. Though for me, this method results in a lot more tangles so I only use it for specific scenarios.
 Probably 20 years ago, I was fishing the Clinch River with a buddy during the sulfur hatch. I won’t get into what has happened to that hatch, but back then, it was epic. Sulfurs would come off by the thousands for 4-6 hours a day for about 3 months. We would drive down from Kentucky to fish it and on most trips, we would both steadily catch fish, many topping 20”.
 If fish are actively rising but you don’t see any bugs in the air, check the water. Try to position yourself at the bottom of a feeding lane (downstream of where the fish are feeding) and watch the surface of the water (and just beneath) for drifting bugs. Holding a fine mesh net in the current is a great way to collect what’s coming down the channel, but if you don’t have one, your eyeballs will do just fine. If you see some insects, capture one and try to match it with a fly pattern.
 In the last ten years or so, the term “Euro Nymphing” or “Czech Nymphing” has become more and more common, and is often billed as a revolutionary style of fishing. Basically, it is just nymph fishing without a strike indicator. It’s akin to what many for years have referred to as short-line or straight-line nymphing. Others refer to it as high-sticking. Or the old mountain fishermen around here just call it nymphing, because it’s how they’ve fished for decades and decades.
 We often hear about the importance of fishing terrestrials in the summer months. Out west, the conversation usually focuses on hoppers. Around here, we talk more about beetles, ants, and inchworms. Regardless, there are a number of land-based insects from beetles, ants and hoppers to cicadas, bees and black flies that find their way into the water during the summer months.

 As many of you know, I spend nearly 200 days a year fishing and guiding on small mountain streams in the Smoky Mountains where creel surveys indicate that approximately 90% of (unguided) fishermen never catch a fish. Meanwhile, the 10% who do catch fish tend to catch A LOT of them. When fishing small streams, it’s a fine line between getting skunked and catching 50, and most of the time, the difference isn’t what’s in your fly box. In the Smokies and other similar small mountain streams, approach and presentation is the name of the game and to have success, you may need to adjust a few of your techniques. Listed below are 10 tips that may make your next small stream fishing trip more productive.