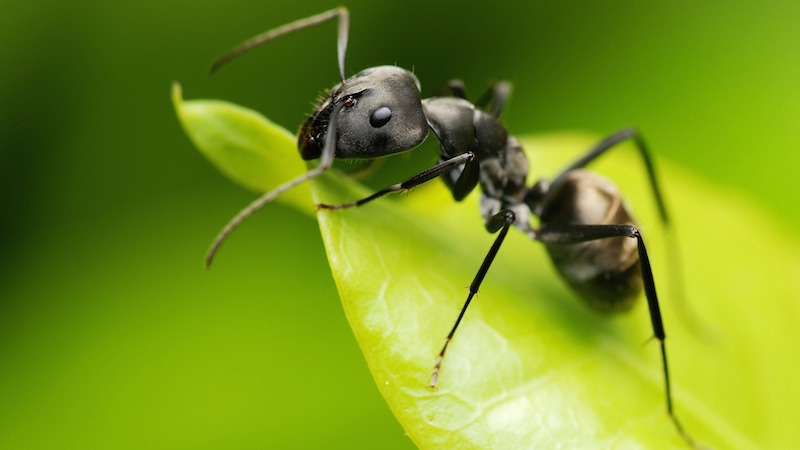
I have repeatedly heard these two statements throughout my fly fishing life, and I’d have to say, I agree with both. Ants are not only abundant in nearly every stream where trout live, they’re pretty easy pickin’s once they make their way into the water. And for Smoky Mountain trout, they’re one of the few meals available in the summer months.
From a fishing perspective, I love ants for their versatility. Whether it’s topwater in heavier current, topwater in low, slow runs, or below the surface… There’s an ant for that!
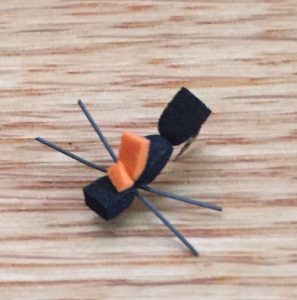
Chernobyl Ant
Made popular in the American West, a Chernobyl Ant is an oversized ant pattern, often tied on a size #6 hook or even bigger! While they are considerably larger than most natural ants, the trout don’t seem to mind. Trout may actually take them more for a beetle or some other type of terrestrial, but who cares? They eat them. I typically find the traditional Chernobyl Ants too big for slower water, though I have had a number of nice fish eat them on slow, shady edges of summertime pools. The Chernobyl is best suited for heavier water with a little more chop and because of its buoyancy, is a great dry fly to support a dropper nymph.
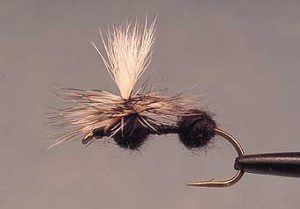
Mini-Chernobyl Ant
Most of the time, however, I scale the fly size down to a #12 or #14, making it more of a “mini-Chernobyl.” At this size, it makes a great generic searching pattern from late spring through early fall. It rides a little lower in the water, sometimes making it difficult to see in choppy water or where there is excessive glare. But with a brighter piece of foam on top of the fly, you can pick it up most of the time.
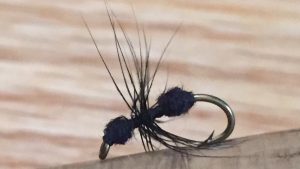
Parachute Ant
In late summer and early fall, or anytime when the water is low, fish are spookier and big foam flies (even the mini-Chernobyl) can send the fish running for cover. A parachute ant pattern can be more effective during these times. It lands softer and provides a little more natural silhouette. I typically fish these in smaller sizes like #16 and # 18. Tying these with a white or orange post makes them visible in most conditions.
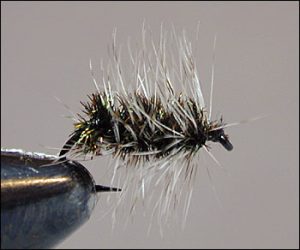
Soft Hackle Ant
One of the most underutilized methods for fishing an ant is to fish it below the surface. Ants are not particularly strong swimmers and often find themselves drowning when they’re in the water. Fishing an ant between the surface and the middle of the water column can be highly productive. Hard bodied ants or, my favorite, soft hackle ants, in a size #14 or #16 are great for this. I’ll often fish one as the top fly of a two-fly nymph/wet fly rig, especially when streams are running full. When streams are low, I like to put a soft hackle ant as a dropper off a dry fly. It hangs in, or just below the surface film and will often fool the most finicky of trout.
Most of the ants I fish are black but can be effective in brown, tan, or cinnamon as well. You can fish them almost anytime of year but they will be most productive during the summer. Ants also tend to be most active through the middle of the day so that is when trout are most likely to see them.
In any case, you should have at least one ant pattern in your fly selection, preferably two or three variations. You can find the mini-Chernobyl and the Soft Hackle Ant in the Boys of Summer fly selection on my web site.
Learn more about Smoky Mountain hatches and flies in my hatch guide.
As many of you know, I spend nearly 200 days a year fishing and guiding on small mountain streams in the Smoky Mountains where creel surveys indicate that approximately 90% of (unguided) fishermen never catch a fish. Meanwhile, the 10% who do catch fish tend to catch A LOT of them. When fishing small streams, it’s a fine line between getting skunked and catching 50, and most of the time, the difference isn’t what’s in your fly box. In the Smokies and other similar small mountain streams, approach and presentation is the name of the game and to have success, you may need to adjust a few of your techniques. Listed below are 10 tips that may make your next small stream fishing trip more productive.
Dress for Success: As simple as it sounds, one of the biggest keys to being successful is not spooking the fish. There are a number of ways you can spook a trout but it all starts with what you wear. Leave the coral casting shirts at home. Instead, dress in earth tones like olive, tan, and grey. You don’t need to be a fly fishing commando with face paint and twigs in your hat but you do need to blend in.
This doesn’t matter as much on big, open rivers because you’re usually casting farther and your backdrop is the sky. On small mountain streams, you’re closer to the fish and your backdrop is usually trees, bushes, and rocks. Brighter colors stand out against that backdrop and allow the trout to more easily detect your movement.
Wade Quietly: Think Great Blue Heron and not Labrador Retriever when you’re moving through the stream. Step slowly, quietly, and try not to drag your legs through the water. Again, you’re closer to the fish in these streams and the fish are going to be sensitive to splashes and rocks scraping together. For this same reason, I don’t encourage wearing studded wading boots on these streams.
Move Upstream: Trout are going to be facing upstream watching a current for food. By moving upstream, you will be staying behind the fish making it more difficult for it to detect you.
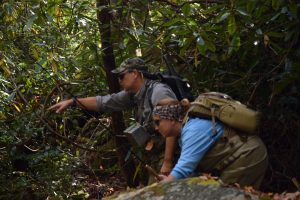
Use Things Like Boulders to Hide Behind
Stay Low: A trout has a cone of vision that allows it to see things above it. The closer and higher up you are, the more the fish will be able to visually detect your movements. As before, you don’t have to be a fly fishing commando and belly crawl from spot to spot. Just try to crouch more when approaching a run and take advantage of natural barriers. For example, if there’s a boulder in the water, stay behind it rather than standing on it.
Read the Water: Trout won’t be just anywhere in the stream. Aimlessly casting your fly around the creek is not only unproductive, you risk spooking the good spots by throwing your line across them. Most of what you’ll find in small mountain streams is pocket water, which is just faster water interspersed with large rocks. Almost everywhere a current breaks over or around a rock creates a holding area for a trout, usually on the edges of the current and directly above and below the rock.
Look Before You Leap
Reading water becomes very instinctive with a little experience, but at first, you’ll have to think about it a little more. Look at each spot you’re approaching and consider that trout need three basic things: food, cover, and comfort. Food is typically going to be concentrated more in the currents rather than in still water. Cover is typically going to be found in deeper water and/or under things like rocks. Comfort is going to be found in places that don’t stress the fish, like slower currents rather than turbulent white water, or shade rather than sun on a bright, warm day.
Position First, Cast Second: Making a good presentation is the other biggest key to success on small streams, and one of the most challenging. Many anglers mistakenly stay too far back from their target and cast way too much line. In smaller mountain streams, you typically have a fairly large volume of water moving downhill through a narrow area. Everyplace the water breaks around a rock creates a velocity change, resulting in dozens of different current speeds. Making long casts puts line across all of these currents and creates drag on the fly. Drag on the fly means you don’t catch fish.
Attempting to overcome this exclusively by mending line is often impractical not only because of the numerous varied currents, but you simply don’t have time to do that much mending when casting to such small target areas. Your best course of action in pocket water is usually to get closer to the target where you can keep most of the line and leader off the water, often eliminating the need to mend altogether. At the very least, it will be easier to mend a short length of line on one current than a long length of line on five currents.
To get closer and keep from spooking fish, the idea is to keep something between you and the fish, like a boulder or simply a fast current. If you want to drift a fly on the inside edge of a current, you’re going to approach from the lower outside of the current, using that current to conceal you from the fish on the other side. Try to get close enough to use the length of your arm and rod to reach across the current and keep line completely off of the faster water. A longer rod will be beneficial because it’s going to give you more reach, allowing you to stay back a little farther. Of course, utilizing steps 1-4 are critical to making this work.
As you move up the stream, you’re constantly repositioning yourself for the next spot. Sometimes you’re repositioning yourself within the same pocket by fishing the near current first, moving closer, then fishing the far current. Remember, it has nothing to do with how far you can cast. Rather, it’s where you need to be to control line for the best drift. In pocket water, I’d estimate that 80% of the fish I catch are with less than 4’ of fly line past the rod tip.
When you come to a bigger, slower pool, you may not be able to get as close because you don’t have the faster currents to hide you. You also don’t have the faster currents to screw up your drift. Stay back and make slightly longer casts here. Just be careful not to make long casts to the head of the pool before fishing the tail or you can spook half the fish by lining them. Everything gets broken into pieces here. Whatever you’re going to spook first, fish first.
Minimize False Casting: Or just don’t do it at all. Most of the time when fishing small streams, you’re making very short casts, and in pocket water you’re often using a fixed amount of line. Repeated false casting is unnecessary and is movement above the fish. Wild mountain trout are in the middle of the food chain and they typically associate movement above them with a kingfisher or heron swooping down to eat them.
Position Carefully and Use a Longer Rod for Reach
Use a Longer Rod: There’s a common misconception that you need to have a short rod to fish small streams to stay out of the trees. Again, the idea here is not to make the longest cast possible up the stream without hanging a tree limb. You want to move closer, make short casts, and reach to keep line off of currents. A longer rod will better allow you to do that and I like to fish as long a rod as I can get away with. In the tiniest, rhododendron-choked mountain streams, that may only be 7’, but for typical mountain streams in the Smokies, it’s 8 ½’ – 9’. And yes, even longer tenkara rods can be highly effective for fishing this type of water.
Accuracy is Everything: All of the best small stream fly fishermen I can think of have two things in common. They know exactly where to position themselves before making a cast, and they are great casters. Unfortunately, great casting is often associated with double-hauling 110’ of line, and that’s hardly what I’m talking about. These fishermen aren’t making long casts, but can put the fly exactly where they want it the first time, the second time, and every time. In pocket water, if your first two casts are off target and/or drag a little bit, you still might catch a fish on the third cast, but you’ve probably already spooked the big fish of the hole.
If you’re not one to practice casting in the backyard, you should be. If you are, don’t just try to cast it as far as you can. Instead, practice with 20’ of line and less and try to hit a small target. Try to do it with an overhead cast off both sides of your body. Try to do it side arm. Try to do it with a roll or circle cast. You’ll find that the more you practice off the water, the “luckier” you’ll be on the water.
Keep Moving: In small streams, especially in pocket water, you’re going to catch more fish by covering more stream. Identify the likely spots in a pocket or run, put a half dozen drifts in each spot and catch your fish. If you miss a couple of strikes, put a few more drifts through and move on. If you don’t get a strike, don’t spend an hour there changing flies until you do. Move on. This doesn’t mean speed fish the stream, as you still need to be methodical in your approach. But when you get good at reading water, positioning and casting accuracy, you’ll be able to cover the water quickly and efficiently.
When you’re doing any type of fly fishing that involves stripping in great amounts of line after each cast, keeping that slack line under control can be a challenge. In streams and rivers, it’s usually not too big of a problem because the line will usually rest neatly in the water by your side. In a boat that is not equipped with some sort of stripping deck, it can be a little bit of a problem as your line wants to snag and tangle on absolutely everything in the boat. The biggest challenge is surf fishing because the constant rushing approach and retreat of the tide repeatedly wraps this slack line around your legs.
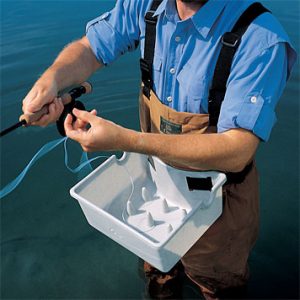
Mesh Stripping Basket
Stripping baskets are designed to solve this problem. I’ve seen larger, freestanding stripping baskets used in boats. But the most common stripping baskets are smaller and are worn around your waste. After you cast and you’re retrieving line, you simply strip and feed the line into the basket. They are basically just a bin with a series of upright “posts.” The posts help prevent the line from tangling inside the basket. There are also baskets made of mesh, but many note that these are often not durable.
Stripping baskets are pretty simple devices that have been around for decades, and they can be purchased from most fly fishing suppliers. If you don’t want to fork over $40-$90 for a plastic tub on a belt, you can also make your own. I did and it works great.
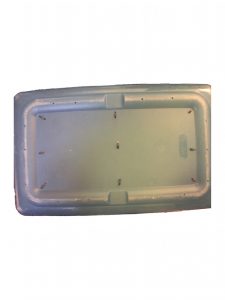
Start with a hard plastic bin like you find in the storage sections at Wal-mart, Home Depot, etc. It should be approximately 16”x 11” and about 5 or 6” deep. You’re also going to need a drill, a sander, some zip ties, wire cutters, and a bungee cord. The bungee cord will be used to secure the bin around your waist, so the length needed will be dependent on your size. You want it to be tight enough to keep the bin from falling off you but not so tight that it’s digging the bin into you.
Bottom View of Homemade Stripping Basket
Begin by drilling approximately ten 3/32” holes in the bottom of the bin near the edges. These will serve as drain holes for your stripping basket to keep water from accumulating inside. Next drill nine 3/32” holes spread equally in the middle of the bin. And drill another nine 3/32” holes right next to the ones you just drilled. These will serve as attachment points for your zip ties (the zip ties will act as the “posts” inside the box that help keep your line from tangling). Finally, drill two larger, approximately 3/16” holes (big enough to accept the hooks on your bungee) on the front of the bin, one near each top corner. This is where your bungee cord will attach. With light sand paper, smooth the front and back of each hole you drilled.
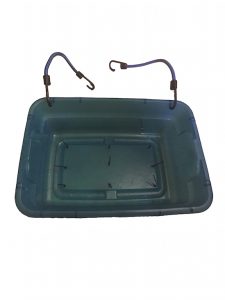
Interior View of Homemade Stripping Basket
Next, attach nine 4” zip ties through the “double holes” you created in the bottom of the bin, allowing the end of the zip tie to point upward into the interior of the bin. With your wire cutters, snip the tips off each zip tie so that you’re left with a 2” post that stands at an approximate right angle from the base of the bin. Hook one end of the bungee into one of the larger front holes. Bring the bungee around your waist and hook the other end into the second hole. I actually use two shorter bungees because I think it’s easier to attach and detach. You’re ready to go fishing!
Where you position the basket is a matter of preference. I typically see them positioned on the front of the body, but I prefer to wear mine closer to my left hip so I can feed line into the basket with a more natural stripping motion. I always use it when surf fishing and very frequently when I’m fishing from the canoe.
There seems to be few things in the fly fishing world that provoke as much debate as strike indicators. The mere existence of strike indicators in the sport of fly fishing can inspire rants from fly fishing purists that rival any political rant of that friend you just hid from your Facebook feed. But even among the firmly pro indicator crowd, nymphers will argue fiercely about the superiority of one type of indicator over another.
For newbies to the sport, a strike indicator is something that is often used while fishing with nymphs (sub surface flies). It is a brightly colored, floating object that is affixed to the leader intended to give the fisherman a visual indication when the fish hits his submerged fly, or nymph. Since the nymph usually can’t be seen under the water, and since it is usually fished with a slack line to achieve a dead drift, the strike can be difficult to detect without the visual aid of a strike indicator. Strike indicators can also be helpful in making sure the nymph is drifting properly (without drag) and at the desired depth.
The obvious question usually arises when hearing this description, “Isn’t that just a bobber?” Pardon the bobber pun, but that opens a whole other can of worms. There are a number of fly fishermen who will stop just short of taking a swing at you if you call a strike indicator a bobber. I assume this animosity stems from the association of bobbers with bait fishermen and fishing live bait; and fly fishermen don’t like to think anything they do might resemble bait fishing. So they call them strike indicators. The truth is that while strike indicators are typically smaller, lighter, and made from different materials than bobbers, they pretty much accomplish the same thing.
I use the term strike indicator because I think there is enough of a difference to specify, kind of like I don’t refer to a hamburger as a sandwich. It’s just different enough. But I won’t be offended if you call a hamburger a sandwich and it won’t offend me if you call a strike indicator a bobber!
Getting re-focused specifically on strike indicators, there are a lot of different kinds, and that’s what I want to focus on here. As mentioned before, most fly fishermen have their favorites, and a lot about selecting strike indicators will boil down to
personal preference. I personally don’t think there is such a thing as the perfect strike indicator. They all have pros and cons and I use different ones for different situations. Often I don’t use one at all, but that’s a topic for another article. Below is a list of some of the more common or popular strike indicators with a description of how they work and some of their strengths and weaknesses.
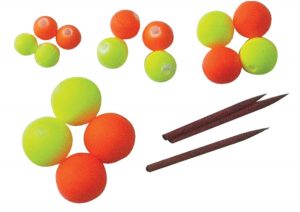
Hard Toothpick Indicators: These are usually made of cork, or balsa, or something similar. They are typically round or oval with a hole drilled in the center. The leader/tippet is inserted through the hole and the indicator may be moved to any position on the leader. Once the desired position is determined, the provided “toothpick” is inserted into the hole to hold the indicator in place.
These are great because they are buoyant, highly visible, reusable, and can easily be adjusted up and down the line to set the nymph at different depths. However, they tend to make more disturbance when they land on the water and can spook more skittish fish. Additionally, their mass makes them difficult to cast when placed on the tippet portion of the leader for shallow nymphing, though smaller ones can be purchased. They are best for deep to mid-depth nymphing and for quick and easy depth adjustment.
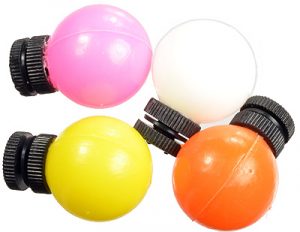
Hard Rubber Band Indicators: These are typically oval in shape and made from the same materials as the hard toothpick type indicators. Instead of having a hole and a toothpick, they have a slit that contains athick rubber band. The leader is inserted into the slit and the indicator is then rotated, allowing the rubber band to twist around the leader to hold the indicator in place.
They have pretty much the same pros and cons as the toothpick indicators. One additional advantage is they can be added or removed while the fly is still attached. However, they have a tendency to kink the leader when twisted on, and they come off the line more easily than other indicators when casting.
Thingamabobber
Balloon Style Indicators: The best known versions of these are the Thingamabobber and Air Lock. These are basically small, plastic balloons. They float great, are highly visible, and can be easily adjusted. They are particularly good if you need an indicator that will suspend larger, heavier flies. The Thingamaboober attaches by looping the leader through a hole and around the indicator. The Air Lock has a slot in the base where the leader is inserted and a separate piece that screws on to hold the indicator in place.
Air Lock
Much like the other hard indicators, when this indicator is set in the tippet section of the leader for shallow nymphing, it is difficult to cast and can create more tangles. It also lands hard on the water. It is more durable and floats better than the other hard indicators.
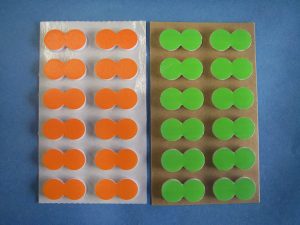
Stick-On Indicators: These are small round or oval pieces of foam that peel off and stick on to the leader. Their greatest value is that they cast easily, even when placed on the tippet and they make very little commotion on the water. So they are a great indicator for shallow nymphing. They float great and multiple indicators can be added to the line to support more weight.
The biggest downside to these is they are not reusable and they are not easily adjusted. When moved they lose a lot of their stick and then have a tendency to slide down the leader. They can usually be moved a few times before you have to trash them. Some complain that they also leave a sticky residue on the leader but I haven’t found that to be a problem.
Yarn Indicators: These are made from a buoyant yarn that is often pre-treated with a waterproofing agent, but floatant may also be added. There are a number of different versions of yarn indicators, but most attach by using some sort of slip knot or loop knot. Like the stick-ons, yarn can be attached to the tippet end of the leader without the worry of a hard landing or a lot of tangles. So this is another good choice for shallow nymphing. Yarn indicators are also very sensitive, so they are great for detecting subtle strikes.
On the downside, I find them difficult to add and remove from the line and when removed, they regularly leave kinks in the line. Larger yarn indicators can be wind resistant and difficult to cast in tight places and they require a little more maintenance to keep them floating.
Putty Indicators: Strike putty comes in a small tub and resembles Play-Doh. You pull out a small gob or big gob depending on how big you want your indicator to be, and you smoosh and roll it on your leader. One of the benefits it that you can smoosh more on if you need more flotation for bigger, heavier flies, or you can pick some off for smaller flies and spookier fish.
I’m trying to be impartial here but I don’t like this stuff. It always comes off, especially in warm weather. It leaves a permanent indicator-colored smudge on your line when you remove it. Finally, every bit of dirt in the vicinity attaches to it, so what starts as orange strike putty soon becomes and greyish, brownish, greenish, orange strike putty.
Dry Fly: In the right situations, a dry fly can serve as an edible strike indicator by adding a nymph “dropper” to it. For many, this is the go-to method because you’re essentially doubling your chances… or so it might seem. Just like any other strike indicator, a dry fly has its pros and cons.
Obviously, one of the big perks is that you have the potential to catch a fish on the nymph or the indicator, since the indicator is a fly. However, most dry flies don’t have near the buoyancy as an actual strike indicator, so if you’re needing to get heavier nymphs near the bottom of a deeper run, the dry fly will routinely get dragged under. In such a scenario, you’re not fishing the dry fly or the nymph very well, and hardly doubling your chances.
The best scenario for fishing a dry fly with a dropper is when you don’t need to get your nymph very deep, and you can fish a dry fly buoyant enough to support the nymph’s weight. I immediately think of pocket water. Another scenario might be in flatter water during a hatch, where you could put a nymph with little to no weight behind a dry fly to suggest an emerger.
The takeaway from all of this should be that there is not one strike indicator that is going to be perfect for every situation. You will likely need a variety to meet a variety of conditions. As with most things, much of it will boil down to personal preference and you should play around with a few different types to find what best meets your needs.
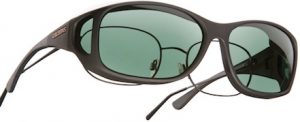
I once heard a highly regarded fly fisherman say that he considered polarized sunglasses to be his most important piece of gear. These sort of statements always amuse me because I can’t help to wonder how important those sunglasses would be if he didn’t have a rod or a line or a fly! But I definitely get what he meant. While polarized sunglasses may not be THE most important piece of gear, they are often the most underestimated by many fishermen.
Polarized Sunglasses
Many fishermen, particularly those new to the sport, probably underestimate them because they don’t understand the difference in sunglasses and polarized sunglasses. They see sunglasses as merely a means of protecting your eyes from bright light and may opt not to wear them at all on overcast days or when fishing in shadier locations like the mountains. While polarized sunglasses do protect your eyes and reduce eyestrain in bright conditions, they have far greater importance when it comes to tactical applications.
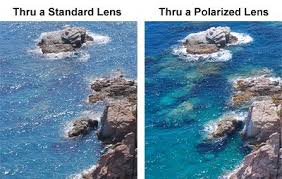
Light usually scatters in all directions, but when it’s reflected from flat surfaces, it typically becomes polarized, travelling in a more uniform (usually horizontal) direction. This creates a serious intensity of reflected light that causes glare and reduces visibility. The more reflective that flat surface is, the more intense the glare will be – consider how a signaling mirror works.
Looking Through Polarized Lens
Water has highly reflective properties and basically acts like a mirror that intensifies those reflected rays even more. I’m sure everyone can think of instances when driving where significant glare was encountered. More than likely, the worst glare you ever encountered when driving was during or right after a rain. Pavement is a flat surface that can reflect light and cause glare. Wet pavement intensifies that reflection and creates more intense glare. With that in mind, it stands to reason that you will get even more intense glare when light reflects off the surface of lakes, rivers, streams, etc.
So, “regular” sunglasses will help in these situations by essentially darkening this reflected light, making it less stressful to your eye, but the glare will still be there and will prohibit you from seeing anything on, or in the case of water, under that surface. But the chemical filter on the lenses of polarized sunglasses is designed to absorb horizontal light waves, while still allowing vertical waves to pass through. Because light only travels in one direction through polarized lenses, glare is eliminated, or at least reduced.
Contrary to what I believe many anglers expect, this technology does not create “magic fish-seeing glasses!” Fish will not suddenly be visible when you put on your polarized glasses, but with better ability to see through the water, you will be much better equipped to spot fish. However, the most consistent benefits you will receive from polarized glasses are the ability to better see your dry fly on the surface, and the ability to read water by better recognizing slower seams and deeper troughs and pockets. Additionally, being able to better see the stream bottom will allow for easier, safer wading.
Just how well your polarized glasses eliminate glare often depends on the angle the light hits and reflects off the water. There will be times on bright sunny days when the light reflects at such a severe angle that even the polarized lenses don’t seem to help. During these times, your best bet is to change the angle the light is hitting your eye by repositioning. For example, you may be on the left side of the stream facing and fishing toward the right and encounter an insurmountable amount of glare. Often by fishing from the other side of the stream and facing/fishing the other direction, you can totally eliminate the glare.
Even on overcast days or in shady areas, you can encounter significant glare, so I almost always wear polarized glasses when fishing. This is where lens color becomes important. Darker lens colors, like gray, will block more light, making them more ideal for bright conditions. They also work well on deep blue water and better maintain true color. But they block a little too much light in low light conditions like overcast, heavy shade, or dawn and dusk, which offsets the benefits of polarization.
Lighter lens colors, like yellow or rose, allow more light in and are perfect for fishing in low light conditions. They often even make things appear brighter. But in bright conditions, you want something that will filter light, not magnify it, so these are not good choices for sunny conditions on open water.
If you plan to fish a lot and expect to fish in a variety of different light conditions, you may find it beneficial to have multiple pairs of polarized glasses in different lens colors. But if you’re looking for one, multi-purpose lens color, an amber, copper or brown color sort of fits right in the middle. And these lens colors work particularly well in shallow water where most fly fishermen operate.
Fitover Glasses
The shape of the frames can also be a factor in how well the glasses work. Frames that “wrap” more will help prevent direct and/or reflected light from entering on the sides. “Straight” frames, like an aviator style, allow more light in from side and rear angles. While prescription polarized sunglasses are available they can be problematic in a wrap style frame. Essentially, you’re dealing with a bent lens on a wrap style frame. The stronger the prescription and the more severe the bend in the lens, the more distortion you’ll get when looking side to side. Straight frames are better suited for prescription sunglasses.
If you wear corrective lenses and prefer the benefits of a wrap style frame or if you simply don’t want to fork over the money for prescription sunglasses, there are a number “fitover” sunglasses that are designed to be worn right over your regular eyeglasses.
It’s nearly impossible to talk about leaders without talking about tippet, and vice versa. However, we could go into an enormous amount of detail on either of them – so much so that it would defeat the intended purpose of a brief monthly article that attempts to provide a simple definition of how particular pieces of fly fishing gear “work.” So, consider this a broad introduction of how the two things work together as part of the overall fly fishing “system.” We’ll talk about each individually in more detail in future articles.
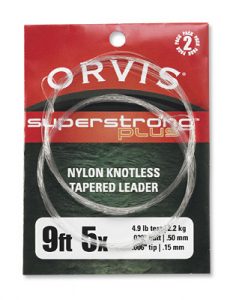
Typical Leader and Package
The leader is the monofilament (usually) connection between the weighted fly line and the fly. Most commonly 7’ to 12’ in length, the leader is typically tapered and consists of three parts: the butt, the taper, and the tippet. These parts can be completely separate and easily distinguished in formulated leaders that are created by knotting different diameters of monofilament together. However, most commercially produced leaders are created with an acid process that results in a knotless, seamless taper from top to bottom.
In either case, the butt is the thickest section that attaches to the fly line. Its purpose is to “turn the leader over” with the cast. A leader with no butt, or too thin of a butt, has a tendency to collapse rather than extend and straighten. The tippet is the thinnest part of the leader that attaches to the fly. It is intended to allow the energy of the cast to dissipate, resulting in a cast that doesn’t crash on the water. The tippet also allows for a less visible connection to the fly. The taper is the section between the butt and tippet that provides a smooth, progressive transfer of energy. A leader with a thick butt tied directly to thin tippet has a tendency to “hinge.”
Leaders are primarily sized by their length and tippet size. So, if you purchase a 9’ 5x leader, it has a tippet size of 5X and its overall length is 9’. As a general rule, longer leaders are advantageous for not only creating more distance between fly line and fly, but for achieving better drifts in “technical” currents. However, they are more difficult to cast and more prone to find overhanging limbs! A shorter leader can allow for more accuracy in tighter areas.
The tippet is sized by its diameter and is indicated by a number followed by an “x.” The bigger the number, the smaller the tippet, so a 6X tippet is considerably smaller than a 2X tippet. Without getting too deep into the history of what now seems a rather antiquated system, it all works off the number 11. If you subtract the tippet size from 11, you get the actual diameter measured in thousandths of an inch. For instance, 6X tippet is .005”. It works in reverse too. If the actual diameter of the monofilament is .007”, the tippet size is 4X: 11-7=4. Pretty weird, huh?
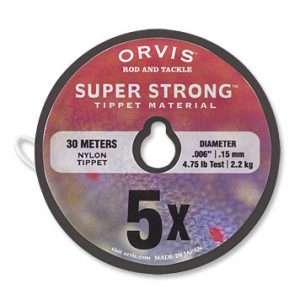
Tippet Spool
You don’t need to know all of that, though. Just know that the tippet size should typically be chosen based on the fly size. Small flies should have small tippets and big flies should have big tippets. Some leader packages will have cross-reference charts on the back indicating which tippet sizes match which fly sizes. Another neat trick is to divide the fly size by 3. So a size #12 fly would best match a size 4X tippet. Could you use a 5X tippet on a #12 fly? Absolutely. This is just a guideline. But the farther you stray from the guideline the more problems you’ll encounter.
In addition to being part of the leader, tippet can be purchased by itself on spools. Tippet material can be pulled from the spool and spliced to the leader with a knot to rebuild or alter the leader. For instance, if you start the day with a 9’ 5X leader and you change flies a few times or break off in a tree, your tippet gets shorter and shorter. You can add tippet from a spool when this happens to build the leader back to its original size.
If you’ve ever fished with me or have read more than two articles in this newsletter, you undoubtedly know how much I emphasize the importance of water temperature when fishing for wild trout. Often in the summer, it can be too warm in many places, causing trout to be lethargic or even migrate to cooler water. In winter, it can be too cold, causing changes in metabolism and a shut down in feeding. In early spring, you’re often fishing right on the edge of good water temperatures. Throughout the day, you may encounter totally different feeding behaviors – from hour to hour and from pool to pool.
Though it’s not quite this exact, 50-degrees is kind of the magic number we’re looking for. When we see water temperatures at or above 50-degrees for the better part of the day, we typically start to see actively feeding fish. This is due to not only the change in metabolism, but also the increase in bug activity. It can be deceiving, though, when we start to have these warmer days but the overnight temperatures are still getting pretty cold. It may be late morning or early afternoon before the water has had time to warm to a “stimulating” temperature.
So forget what your granddad told you about getting to the water at dawn. That’s great advice during the heat of summer, but in early spring, it will usually only give you a lot of casting practice until things heat up later in the day. While there are, of course, variables based mostly on weather, your best fishing this time of year will probably be between 11:00 a.m. and 5:00 p.m. Sleep in, eat a late breakfast, get to the water around 10 so you have some time to gear up, and enjoy your afternoon.
This is also not the best time of year for making that 7-mile hike to a high elevation brook trout stream. With very rare exceptions, your water temperatures are going to be considerably cooler at high elevations. This is the time to focus on lower and mid elevation streams.
The heads of large pools can be great locations for feeding trout
Now that you’re at the right place at the right time, there are other things you want to look for. While slower pools often fish poorly later in the year, they can be great places to fish in early spring, mostly because of the abundance of food. The best hatches, at least in the Smokies, occur in the spring and you can target a lot of feeding fish in these pools. Dry fly fishing can be at its best on early spring afternoons and it’s a great opportunity to find a larger brown trout feeding on the surface. Even if there is not an active hatch, there are plenty of bugs preparing to hatch. Drifting nymphs along the bottom, particularly near the heads of these pools can be very productive.
The other advantage to larger pools this time of year is they typically have less tree canopy and the water gets more direct sunlight. Seeking direct sunlight is counterintuitive to many fishermen, but in the early season, it often means warmer water. And even if the sunlight isn’t significantly warming the water, it is likely stimulating more bug activity, which will in turn, stimulate fish. Still, bright sunlight can have a negative impact on fish and their willingness to feed, so I try to seek out and pay particular attention to the “sweet spots” – good holding water that has a nice mix of sun and shadows.
Finally, when choosing days to fish this time of year, really try to pay attention to the overnight lows more than the daytime highs. Warmer overnights will better maintain those water temperatures we’re looking for. And don’t be afraid to get wet. A warm rain can raise water temperatures and turn fish on quicker than anything this time of year!
In normal years, there are going to be periods that are dryer than others, and in a rainfall driven fishery like the Smoky Mountains, water levels routinely fluctuate and you have to be able to adjust your strategies to match the conditions. While some years can give us low water conditions any time of year, late summer and fall is historically the driest time of year in the Smokies. We’re fortunate that we’ve had a fairly wet summer this year and have a little more “reserve” going into fall, but September and and October will undoubtedly show us drier conditions and fishing low water can be a challenge.
What’s particularly bad is when we have a summer drought with low water AND warm water temperatures. That’s a pretty tough combination. But when you’re dealing with the typical low water we see in September and particularly October, water temperatures are cool and trout are very active. So, there’s one obstacle, warm water temperatures, out of the way. Below are some tips for dealing with the other obstacle.
Staying low will help keep you out of the trout’s view
The biggest problem low water creates is it makes already spooky fish spookier. While having less water depth can be an issue, the real challenge is having less water flow. When streams are full, the extra flow of water helps conceal you and your movements. The surface is more broken, making the trout’s view of the outside world more distorted and the extra flow helps to dampen the noise you make when you move in or near the water. In a nutshell, you’re going to have to be a lot stealthier when you fish for low water trout.
I’ve talked about this first piece in the article Dress for Success, but it all starts with what you wear. When you are fishing in the Smoky Mountains, your backdrop consists mostly of trees and bushes. When you wear bright colors, your silhouette against that woody backdrop is much more pronounced, and the trout more easily detects your movements. Dress in dull, earth-tone colors like brown, tan, olive, or grey. And stay low. Crouching, squatting, kneeling and/or staying behind boulders will help eliminate your silhouette altogether.
Without the benefit of faster currents, you have to stay farther away from the fish. Simply staying back farther and casting farther can cause drag issues when you’re working across currents, as more line will be on the water. Use the longest rod you can get away with to allow for extra reach across those currents. With shorter rods, take extra measures to position yourself as much downstream from the fish as possible. This will put your line/leader more in the same speed current as the fly and provide a better drift.
Speaking of lines… Heavier fly lines will make more commotion on the water and will drag more. Try using lighter lines, 4-weight and smaller, and keep them off the water as much as you can by keeping the rod tip up. Longer leaders with longer and finer tippet will also help with less drag and less commotion on the water. For small to mid size streams, I usually fish 9’ leaders in low water, and often 12’ leaders on larger rivers.
Griffith’s Gnat
Lower, slower moving water also gives the fish a better, longer look at your fly. Larger, bushier flies will often produce “short strikes,” where the fish merely bumps or noses it, or stops just short of taking it. Smaller flies and low profile flies like parachutes or comparaduns, will often solve that. A Griffith’s Gnat in a size #18 is a favorite late season, low water pattern. A Parachute Adams in size #18 is another favorite. Terrestrials are still abundant this time of year and a small parachute ant or a soft hackle ant dropper can be very effective in these conditions.
You may also try to seek out choppier water. Fish will often position themselves more in choppy water during these conditions to remain less visible to predators.
Mostly, success in low water is going to boil down to movement. Keep your false casting to an absolute minimum, like, not at all if you can. Don’t go rushing into each new spot. First, assess the pocket, pool, or run from afar, then keep a low profile and approach it slowly.
After doing all of this, as simple as it sounds, be ready! Your strike is most often going to come on the first cast and you don’t get many second chances.
Understanding How Trout Feed and the Importance of Presentation….
It has been claimed by many, beginner and expert alike, that Smoky Mountain trout are among the most difficult to catch. Talk to a few Smoky Mountain anglers for any length of time and at some point the statement, “If you can catch them here, you can catch them anywhere!” will certainly be heard. That’s not entirely true. Simply driving a little north to the Clinch will teach you that. Employing Smoky Mountain fishing tactics on that big tailwater may reap rewards in a few areas, but the long, slick waters of the Clinch will require different skills to be consistently successful. Almost every fishery has certain characteristics and little quirks that make it uniquely challenging.
But this much is true… If you are catching fish in the Smokies on a consistent basis and understand why and how you’re catching them, applying those skills to other freestone rivers, such as those in the American West, will put you a step ahead of many anglers. But why? What is it about these little mountain streams that is so challenging?
The first thing is simply the fact that you typically have a significant volume of water in a small space. Rather than water flowing through a broad basin, where current speeds are somewhat consistent and concentrated in long, broad channels; in these small streams, the flow breaks and changes speed dramatically with every boulder it hits. So in many situations, in one fishy run, there may be fifteen different current speeds with which to contend. That may not be a big deal if you understand how that phenomenon can impede drift and you can approach those runs properly, but failure to understand this can convince many an angler that there are no fish in these streams!
I’ve seen a number of VERY good fly fishermen come to the Smokies and get skunked. In most cases it is because they are big river fishermen and they approach these streams in the same way they approach the big rivers they normally fish. That usually entails standing erect at the bottom of a run and making a 40-60 foot, up and across cast to the top of the run. The result is 40-60 feet of line being grabbed by fifteen different current speeds, and an attached fly dragging like RuPaul! All but the smallest and dumbest fish in the Smokies will not tolerate a poor drift, and with the exception of the rare slow pools, there is no way you’re going to be able to cast that much line and be able to control your drift. Executing a good drift in the Smokies is going to require getting closer to the fish.
First, it is important to understand where the fish will be and why. You can find fish in the slow pools but these are among the most difficult to target. Without a defined channel to concentrate food, fish in these pools will be very spread out and often cruising, feeding opportunistically. Unless there is a significant hatch coming off to motivate consistent feeding and reveal fish when they break the surface for a meal, catching them in these environments is going to require a lot of patience, a lot of trial and error, and a lot of plain dumb luck. This is certainly not to say you can’t catch fish in slow pools in “hatchless” situations, but the odds are not with you.
For heavier concentrations of actively feeding fish, you’ll want to be in the riffles and runs where there are clearly defined channels. The stream funnels insects and other food items into these channels, and where you find food, you find fish. And in these food abundant areas, fish are typically “holding,” waiting for the meal to come to them. But because there is so much “stuff” coming through these chutes, from aquatic insects to stream debris, the fish instinctively ignore passing items that don’t look like food. Your imitation dragging through the feeding zone faster than the current because another current is pulling on your fly line, qualifies as something fish will ignore. To control the fly you have to control the line. To control the line in a run with multiple currents, you have to get closer.
To get closer, you’ll want to employ the strategies discussed in Part 1 of this article: dress accordingly, stay low, and be stealthy. The idea is to get into a position where you can use the length of your rod to keep the fly line out of any currents other than the one where your fly is. So you’re keeping the rod high, keeping most, if not all, of the line off the water so that there is very little to impede the drift. By following the fly with your rod tip, you can extend your drift through the run. There are going to be a number of these little feeding zones within a run, so you try to hit one, reposition yourself, hit the next, reposition yourself, and so on.
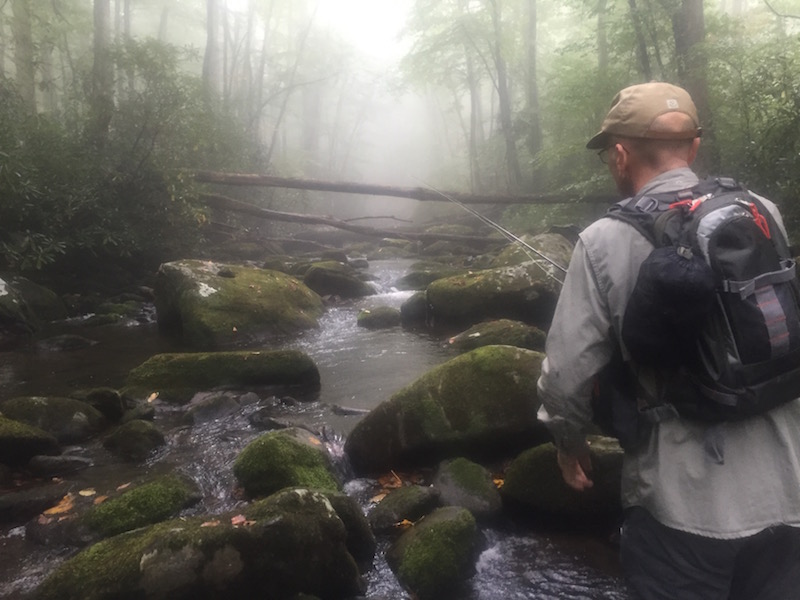
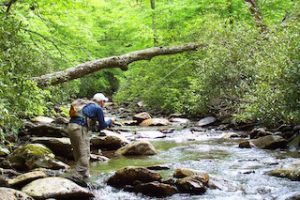
Check out the photo above – a typical stretch of water in the Smokies. You can easily see the numerous changes in current speed and direction in just this small area. Rather than standing at the bottom right of the photo and casting 40-50 feet to the top left of the photo, our angler is intelligently breaking this stretch into defined sections. He has likely already fished the water below, to his left, and right in front of him. Notice he has his rod high, keeping the line off the current directly in front of him, and allowing the fly to drift nicely in the current breaking around the right of the boulder. Next, he will likely step up to the boulder and fish that large pocket above it. Well done!
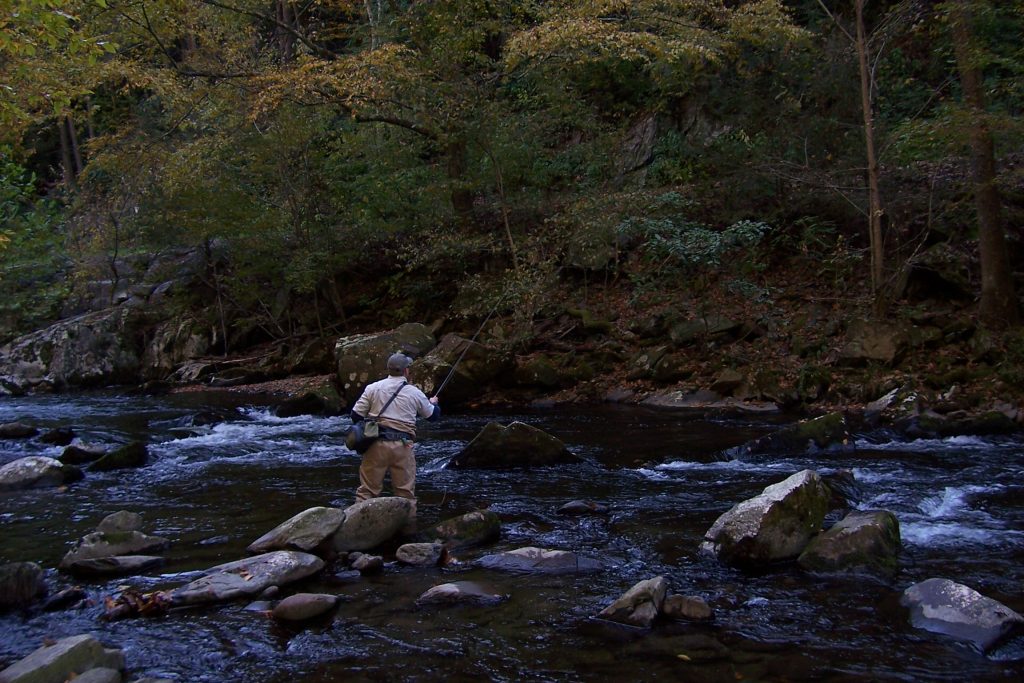
The angler in this photo is also doing a good job with a little more line out. Notice he is concealing himself behind a boulder and his rod is help upward, keeping the current lip in front of him from grabbing the line. The line that is on the water is all in the same current speed. Again, well done!
He likely fished the current below that boulder before stepping into that position. It’s all about planning your attack. Determine your targets and carefully place yourself in the proper position before casting to them.
Setting the Hook
Fishermen in the Smokies also miss A LOT of strikes. Some of the misses can be attributed to the fact that trout in the Smokies hit and spit a fly with amazing speed. You can just go on and plan on missing some strikes when you fish here – just like you can plan on getting hung in a few trees – it’s all part of it!
But you can greatly increase your number of hook-ups by implementing the above strategies. While many strikes are missed due to the angler just not being ready or reacting to slowly, just as many are the result of too much line on the water. The more line you have out, the more line you have to move and tighten to set the hook. And when that line has a lot of slack in it, there will be even more delay.
It’s a delicate balance. In most cases, you have to have a little bit of slack in your line to allow your nymph or dry fly to drift without drag. Keeping that slack to an absolute minimum will allow the rod tip to lift and tighten the line on the fish much more quickly and will certainly result in more fish to hand.
Understanding a Trout’s Vision and Instincts for a Better Approach…. On numerous occasions guiding clients in the Smoky Mountains, I have been met with a suspicious and doubting eye when I provide certain instruction regarding approaching and presenting the fly to wild mountain trout. The reply is often something like, “Are they really that smart?” No, trout aren’t that smart. They have the brain the size of a pea. But the fact that they aren’t that smart is what allows them to be so good at what they do. Unlike us more “intelligent” humans, trout aren’t distracted by health care reform, college football, paying the mortgage, or who got voted off American Idol last night. Their entire existence is ruled by instinct, and their only real concerns are receiving enough oxygen, eating, and not being eaten! When your life is that simple, it allows you to remain pretty focused.
Think about a simple housefly for a moment. Trying to catch one is difficult. A housefly isn’t smart. It’s not planning out evasive maneuvers in the event of a human attempting to catch it. First I’ll cut right, then I’ll go up, then I’ll get behind the blinds at the window…. It’s pure instinct. Survival. Something we humans have to go through rigorous, repetitive training to achieve.
One of the biggest mistakes anglers make when approaching fish is doing so from upstream. To a trout, a stream is a conveyor belt of food, constantly delivering hatched aquatic insects and terrestrials on the surface and juvenile aquatic insects (nymphs) between the surface and the bottom. Trout aren’t looking down the conveyor belt to see what they’ve missed, they’re looking up the conveyor belt to see what meal is coming next. If the trout see something suspicious at the top of the conveyor belt, like you, they’re going to likely quit feeding until they feel safe again. They may even go hide!
So the trout knows I’m trying to catch him? No! But he’s spooked. Think about a situation you’ve been in where your senses were heightened. Maybe you’re walking alone late at night on a dark street and you hear a strange noise up ahead. Is it the wind? A stray cat? Another person? A serial killer? You don’t know, so what do you do? Do you race up ahead to check it out? Do you ignore it and keep on as if nothing happened? You would probably stop doing what you’re doing and assess the situation. You might even turn around and go the other way. It’s the same thing if something disrupts a trout’s comfort zone while they’re feeding.
Another interesting way to look at it is if you take the dark street scenario described above and insert a thirteen year old rather than an adult. Due to limited life experiences and a feeling of invincibility, the thirteen year old may proceed with less caution, if any at all. Now you know why big (old) fish are harder to catch than small ones!
You’ll be far more successful if you approach the fish from downstream and cast upstream. This puts you behind the feeding fish where you are less likely to be detected. Notice I said less likely. You can still alert fish to your presence by making a lot of commotion through careless wading. When possible, stay out of the water or right on the edge. When you do enter and move through the water, do so quietly and deliberately. Stomping along the stream bottom and/or splashing through the water will produce excessive vibrations, again alerting the fish to possible danger.
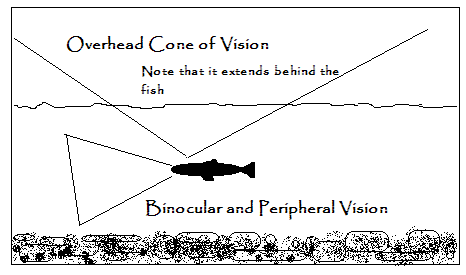
You also want to keep a low profile to remain unseen by the fish. So trout have eyes in the back of their heads? No, but they can still see things behind them – to an extent. Trout are predators and prey, and they are blessed with vision that benefits them in both roles. Like humans, they have binocular vision that allows them to see straight ahead underwater. Because of the placement of their eyes, they also have an extended range of peripheral vision, allowing them to see things on either side of them. Since this vision is used to look straight ahead and to each side, there is little distortion and it’s very clear – much like we would see under water.
The cone
But trout also have a cone-shaped field of vision above them that allows them to detect predators from above. Because of the distortion caused by light refracting as it hits the surface of the water, trout are unable to clearly make out objects, so this is used to visually detect movement more than anything else, such as a Kingfisher swooping down to get them. It’s the same as if you were to lie down on the bottom of a swimming pool and look up. You would be able to see objects but they would be so distorted it would be difficult to differentiate between a person and a tree – until that person started to move. However, something that is right on the surface, like a mayfly dun, will be clearer to the trout than something above the surface, like a bird – at least the silhouette will be much more distinct – making this ability effective for feeding on adult insects and terrestrials.
As you’ll notice in the poorly illustrated drawing above, that field of vision does extend a little behind the trout – upward and outward. Everything that makes its way into that cone can be detected by the fish. So, when approaching a trout from behind, how close you are determines whether or not you’re in that cone of vision. Notice however, that a short object can be directly behind the trout and unseen while a tall object would be in the field of vision. This is why many successful Smoky Mountain anglers can be seen crouching or squatting when closely approaching fish. The lower profile keeps them out of the fish’s “window.”
The other thing that should be considered is the type of water you’re fishing. The faster and more broken the water is, the more difficult it will be for the trout to detect you, making it easier for you to get closer to the prey. On the other hand, trout in the slower, flatter runs and pools are going to be able to detect you much more easily and may require you to stay back a little more and put a little more distance on that cast.
In any situation, the more you can conceal yourself, the more successful you will be. Stay low. Wade slowly and quietly. Hide behind rocks and boulders when you can. And for God’s sake, leave the bright orange, hot pink, neon yellow clothing at home. You don’t have to be dressed in full camo with twigs and branches in your hat to catch fish here, but simply dressing in earth tones – browns, olives, khakis, and greys – will go a long way toward not scaring every fish before you even make a cast!
Check back soon to see Part 2 of this series about how trout feed and how to effectively present your fly.
 “When all else fails, try an ant.”
 As many of you know, I spend nearly 200 days a year fishing and guiding on small mountain streams in the Smoky Mountains where creel surveys indicate that approximately 90% of (unguided) fishermen never catch a fish. Meanwhile, the 10% who do catch fish tend to catch A LOT of them. When fishing small streams, it’s a fine line between getting skunked and catching 50, and most of the time, the difference isn’t what’s in your fly box. In the Smokies and other similar small mountain streams, approach and presentation is the name of the game and to have success, you may need to adjust a few of your techniques. Listed below are 10 tips that may make your next small stream fishing trip more productive.
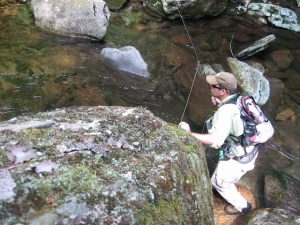
 Hard Toothpick Indicators: These are usually made of cork, or balsa, or something similar. They are typically round or oval with a hole drilled in the center. The leader/tippet is inserted through the hole and the indicator may be moved to any position on the leader. Once the desired position is determined, the provided “toothpick” is inserted into the hole to hold the indicator in place.
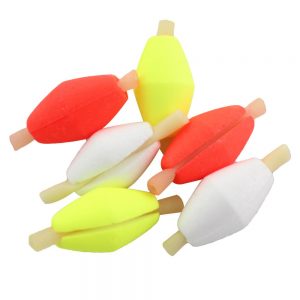 Hard Rubber Band Indicators: These are typically oval in shape and made from the same materials as the hard toothpick type indicators. Instead of having a hole and a toothpick, they have a slit that contains athick rubber band. The leader is inserted into the slit and the indicator is then rotated, allowing the rubber band to twist around the leader to hold the indicator in place.
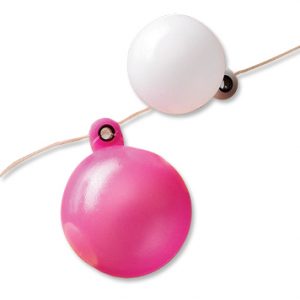
 Stick-On Indicators: These are small round or oval pieces of foam that peel off and stick on to the leader. Their greatest value is that they cast easily, even when placed on the tippet and they make very little commotion on the water. So they are a great indicator for shallow nymphing. They float great and multiple indicators can be added to the line to support more weight.
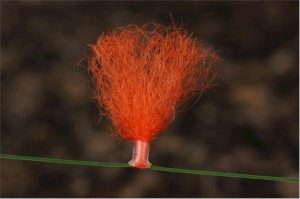 Yarn Indicators: These are made from a buoyant yarn that is often pre-treated with a waterproofing agent, but floatant may also be added. There are a number of different versions of yarn indicators, but most attach by using some sort of slip knot or loop knot. Like the stick-ons, yarn can be attached to the tippet end of the leader without the worry of a hard landing or a lot of tangles. So this is another good choice for shallow nymphing. Yarn indicators are also very sensitive, so they are great for detecting subtle strikes.
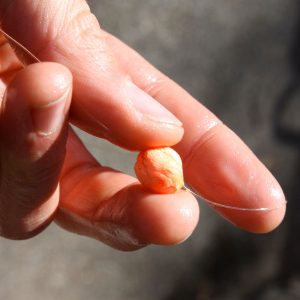 Putty Indicators: Strike putty comes in a small tub and resembles Play-Doh. You pull out a small gob or big gob depending on how big you want your indicator to be, and you smoosh and roll it on your leader. One of the benefits it that you can smoosh more on if you need more flotation for bigger, heavier flies, or you can pick some off for smaller flies and spookier fish.
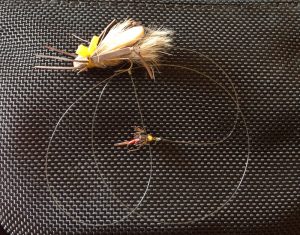 Dry Fly: In the right situations, a dry fly can serve as an edible strike indicator by adding a nymph “dropper” to it. For many, this is the go-to method because you’re essentially doubling your chances… or so it might seem. Just like any other strike indicator, a dry fly has its pros and cons.
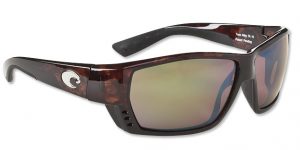
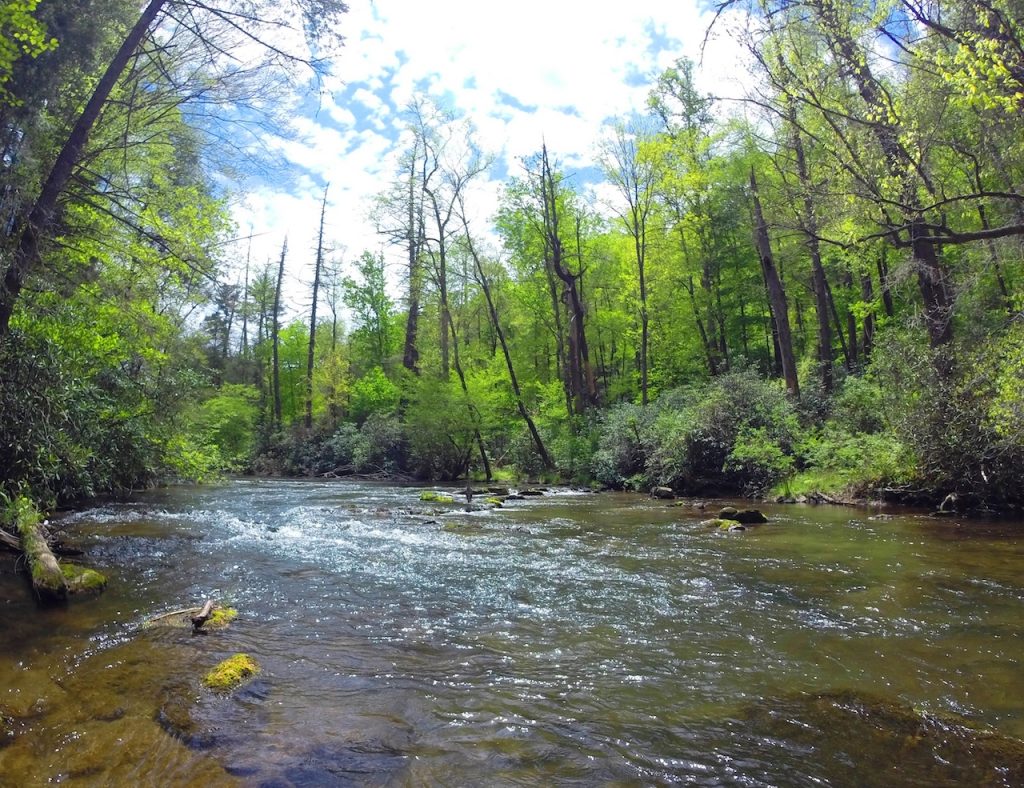
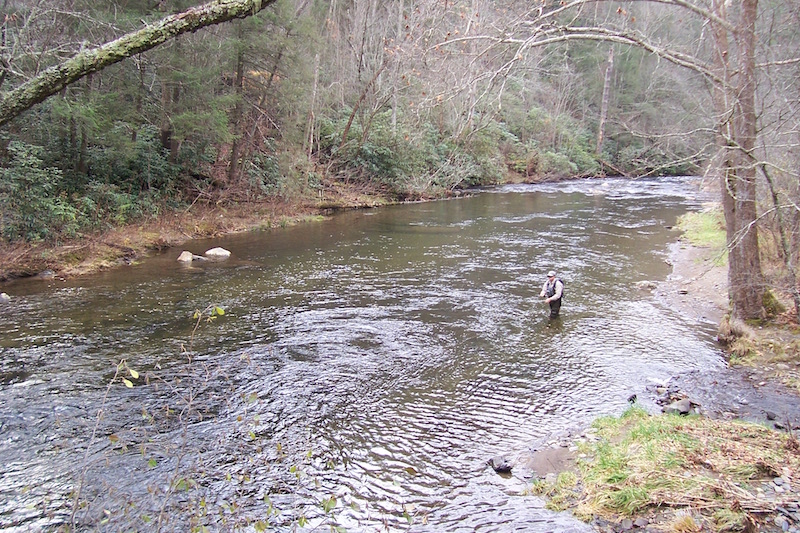

 Check out the photo above – a typical stretch of water in the Smokies. You can easily see the numerous changes in current speed and direction in just this small area. Rather than standing at the bottom right of the photo and casting 40-50 feet to the top left of the photo, our angler is intelligently breaking this stretch into defined sections. He has likely already fished the water below, to his left, and right in front of him. Notice he has his rod high, keeping the line off the current directly in front of him, and allowing the fly to drift nicely in the current breaking around the right of the boulder. Next, he will likely step up to the boulder and fish that large pocket above it. Well done!
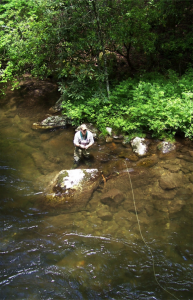 The angler in this photo is also doing a good job with a little more line out. Notice he is concealing himself behind a boulder and his rod is help upward, keeping the current lip in front of him from grabbing the line. The line that is on the water is all in the same current speed. Again, well done!