How Stuff Works: Polarized Sunglasses

I once heard a highly regarded fly fisherman say that he considered polarized sunglasses to be his most important piece of gear. These sort of statements always amuse me because I can’t help to wonder how important those sunglasses would be if he didn’t have a rod or a line or a fly! But I definitely get what he meant. While polarized sunglasses may not be THE most important piece of gear, they are often the most underestimated by many fishermen.

Polarized Sunglasses

Many fishermen, particularly those new to the sport, probably underestimate them because they don’t understand the difference in sunglasses and polarized sunglasses. They see sunglasses as merely a means of protecting your eyes from bright light and may opt not to wear them at all on overcast days or when fishing in shadier locations like the mountains. While polarized sunglasses do protect your eyes and reduce eyestrain in bright conditions, they have far greater importance when it comes to tactical applications.

Light usually scatters in all directions, but when it’s reflected from flat surfaces, it typically becomes polarized, travelling in a more uniform (usually horizontal) direction. This creates a serious intensity of reflected light that causes glare and reduces visibility. The more reflective that flat surface is, the more intense the glare will be – consider how a signaling mirror works.

Looking Through Polarized Lens

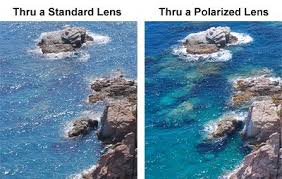
Water has highly reflective properties and basically acts like a mirror that intensifies those reflected rays even more. I’m sure everyone can think of instances when driving where significant glare was encountered. More than likely, the worst glare you ever encountered when driving was during or right after a rain. Pavement is a flat surface that can reflect light and cause glare. Wet pavement intensifies that reflection and creates more intense glare. With that in mind, it stands to reason that you will get even more intense glare when light reflects off the surface of lakes, rivers, streams, etc.

So, “regular” sunglasses will help in these situations by essentially darkening this reflected light, making it less stressful to your eye, but the glare will still be there and will prohibit you from seeing anything on, or in the case of water, under that surface. But the chemical filter on the lenses of polarized sunglasses is designed to absorb horizontal light waves, while still allowing vertical waves to pass through. Because light only travels in one direction through polarized lenses, glare is eliminated, or at least reduced.

Contrary to what I believe many anglers expect, this technology does not create “magic fish-seeing glasses!” Fish will not suddenly be visible when you put on your polarized glasses, but with better ability to see through the water, you will be much better equipped to spot fish. However, the most consistent benefits you will receive from polarized glasses are the ability to better see your dry fly on the surface, and the ability to read water by better recognizing slower seams and deeper troughs and pockets. Additionally, being able to better see the stream bottom will allow for easier, safer wading.

Just how well your polarized glasses eliminate glare often depends on the angle the light hits and reflects off the water. There will be times on bright sunny days when the light reflects at such a severe angle that even the polarized lenses don’t seem to help. During these times, your best bet is to change the angle the light is hitting your eye by repositioning. For example, you may be on the left side of the stream facing and fishing toward the right and encounter an insurmountable amount of glare. Often by fishing from the other side of the stream and facing/fishing the other direction, you can totally eliminate the glare.

Even on overcast days or in shady areas, you can encounter significant glare, so I almost always wear polarized glasses when fishing. This is where lens color becomes important. Darker lens colors, like gray, will block more light, making them more ideal for bright conditions. They also work well on deep blue water and better maintain true color. But they block a little too much light in low light conditions like overcast, heavy shade, or dawn and dusk, which offsets the benefits of polarization.

Lighter lens colors, like yellow or rose, allow more light in and are perfect for fishing in low light conditions. They often even make things appear brighter. But in bright conditions, you want something that will filter light, not magnify it, so these are not good choices for sunny conditions on open water.

If you plan to fish a lot and expect to fish in a variety of different light conditions, you may find it beneficial to have multiple pairs of polarized glasses in different lens colors. But if you’re looking for one, multi-purpose lens color, an amber, copper or brown color sort of fits right in the middle. And these lens colors work particularly well in shallow water where most fly fishermen operate.

Fitover Glasses

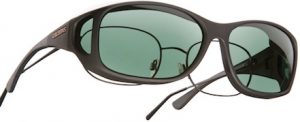
The shape of the frames can also be a factor in how well the glasses work. Frames that “wrap” more will help prevent direct and/or reflected light from entering on the sides. “Straight” frames, like an aviator style, allow more light in from side and rear angles. While prescription polarized sunglasses are available they can be problematic in a wrap style frame. Essentially, you’re dealing with a bent lens on a wrap style frame. The stronger the prescription and the more severe the bend in the lens, the more distortion you’ll get when looking side to side. Straight frames are better suited for prescription sunglasses.

If you wear corrective lenses and prefer the benefits of a wrap style frame or if you simply don’t want to fork over the money for prescription sunglasses, there are a number “fitover” sunglasses that are designed to be worn right over your regular eyeglasses.

How Stuff Works: Leaders & Tippet

It’s nearly impossible to talk about leaders without talking about tippet, and vice versa. However, we could go into an enormous amount of detail on either of them – so much so that it would defeat the intended purpose of a brief monthly article that attempts to provide a simple definition of how particular pieces of fly fishing gear “work.” So, consider this a broad introduction of how the two things work together as part of the overall fly fishing “system.” We’ll talk about each individually in more detail in future articles.

Typical Leader and Package

The leader is the monofilament (usually) connection between the weighted fly line and the fly. Most commonly 7’ to 12’ in length, the leader is typically tapered and consists of three parts: the butt, the taper, and the tippet. These parts can be completely separate and easily distinguished in formulated leaders that are created by knotting different diameters of monofilament together. However, most commercially produced leaders are created with an acid process that results in a knotless, seamless taper from top to bottom.

In either case, the butt is the thickest section that attaches to the fly line. Its purpose is to “turn the leader over” with the cast. A leader with no butt, or too thin of a butt, has a tendency to collapse rather than extend and straighten. The tippet is the thinnest part of the leader that attaches to the fly. It is intended to allow the energy of the cast to dissipate, resulting in a cast that doesn’t crash on the water. The tippet also allows for a less visible connection to the fly. The taper is the section between the butt and tippet that provides a smooth, progressive transfer of energy. A leader with a thick butt tied directly to thin tippet has a tendency to “hinge.”

Leaders are primarily sized by their length and tippet size. So, if you purchase a 9’ 5x leader, it has a tippet size of 5X and its overall length is 9’. As a general rule, longer leaders are advantageous for not only creating more distance between fly line and fly, but for achieving better drifts in “technical” currents. However, they are more difficult to cast and more prone to find overhanging limbs! A shorter leader can allow for more accuracy in tighter areas.

The tippet is sized by its diameter and is indicated by a number followed by an “x.” The bigger the number, the smaller the tippet, so a 6X tippet is considerably smaller than a 2X tippet. Without getting too deep into the history of what now seems a rather antiquated system, it all works off the number 11. If you subtract the tippet size from 11, you get the actual diameter measured in thousandths of an inch. For instance, 6X tippet is .005”. It works in reverse too. If the actual diameter of the monofilament is .007”, the tippet size is 4X: 11-7=4. Pretty weird, huh?

Tippet Spool

You don’t need to know all of that, though. Just know that the tippet size should typically be chosen based on the fly size. Small flies should have small tippets and big flies should have big tippets. Some leader packages will have cross-reference charts on the back indicating which tippet sizes match which fly sizes. Another neat trick is to divide the fly size by 3. So a size #12 fly would best match a size 4X tippet. Could you use a 5X tippet on a #12 fly? Absolutely. This is just a guideline. But the farther you stray from the guideline the more problems you’ll encounter.

In addition to being part of the leader, tippet can be purchased by itself on spools. Tippet material can be pulled from the spool and spliced to the leader with a knot to rebuild or alter the leader. For instance, if you start the day with a 9’ 5X leader and you change flies a few times or break off in a tree, your tippet gets shorter and shorter. You can add tippet from a spool when this happens to build the leader back to its original size.

How Stuff Works: Landing Nets

Variety of Landing Nets

Landing nets are designed to enable anglers to land a fish more easily and safely. They are most beneficial when dealing with larger fish that have a tendency to make one last dart or head shake when you try to grab them, often resulting in the tippet breaking. While in the Smokies, I rarely carry a net because the fish are typically not very large and can be landed by hand with very little trouble, and a net is just one more thing to carry. But I use a net regularly when fishing tailwaters and delayed harvest streams.

Long Handle Carbon Net

Traditionally, nets have been made with a wood frame and cotton netting and that style is still common today. However, wooden frames are more and more frequently being replaced by lighter, carbon frames and rubber is replacing cotton for the netting. The rubber netting has a number of advantages over cotton – the most notable being that it is better on the fish. Cotton netting has a tendency to get caught and tangled in the fins, gills and teeth of the fish and with trout, absorbs and removes some of their protective “slime.” Fly hooks also catch and easily tangle in cotton netting. Rubber netting eliminates all of these problems and holds far less odor than cotton.

Other things to consider when looking for a net are the size and shape. Obviously, if you’re expecting to catch bigger fish you’re going to want a bigger net. A 20-pound striper just won’t fit in a 16 ½” trout net. Landing nets are typically sized by the overall length, including handle, as well as the size of the head (the part that holds the netting). The size of the head should be chosen based on the size of fish you’re pursuing while the overall length (or the handle size) should be chosen based on how you will be pursuing them. For instance, if fishing from a boat, a longer handle may be desirable since it’s more difficult to get the fish close to you. If wading, a long handled net might be too cumbersome to carry all day.

Magnetic Net Holder

If you plan to carry a net with you when wading, there are a number of options that will help keep the net out of the way, yet easy to access when needed. Most every fishing vest or jacket has a D-Ring on the back. The sole purpose of that ring is to clip your net on it. To make it even easier, there are magnetic connectors that include a section of plastic, “pig tail” type cord that allow you to utilize the net while it remains tethered to you. There are also oversized retractors that accomplish the same thing.

Net Holster

Folks who choose to use sling packs or hip packs tend to have trouble finding a suitable location for attaching their net. Attaching it to the pack with a traditional retractor or magnetic connector often leaves it hanging too low or in a location that impedes the casting stroke. I know many who have remedied this by using a type of net “holster” placed on a belt. The net is stored handle down and drawn from the holster when needed.

Like most things in fly fishing, there doesn’t seem to be a “one size fits all” solution to the type of net you use or the method you use to carry it. It’s a matter of finding something that best fits most of your needs and carrying it in the least obtrusive way possible.

Nippers

It’s Time to Quit Using Your Teeth….

Welcome to the wonderful world of nippers! It’s probably pretty easy to figure out that the primary function of nippers (aka clippers, cutters, snips, etc.) is to cut your line. They are mostly used to trim the tag ends of monofilament after tying a knot or to cut a new piece of tippet from a spool. But as you’ll see, the right pair of nippers can perform a number of other tasks as well.

As I have described before, my beginnings in this sport were humble at best and my funds were rather limited. There was a lot I could do with $10 back then and I certainly didn’t want to waste it on nippers – not when I could just use fingernail clippers. That strategy served me well for a time, until I figured out what a lot of fishermen eventually figure out. First, fingernail clippers are made of very cheap, soft metal, and after repeatedly clipping monofilament line, they begin forming a series of nicks in the blade. It’s not long before they become completely useless. Second, when regularly exposed to water (such as every time you go fishing), they rust – quickly.

So you can constantly replace in expensive fingernail clippers or you can do what I ultimately did – drop $10 on a decent pair of nippers. They’re rustproof and will last years before the blades begin wearing out. The other benefit to a good pair of nippers is they are designed to cut line, not fingernails. What does that mean?

When working with smaller trout flies, particularly dry flies, it can be difficult to prevent the large, curved head of generic fingernail clippers from also clipping away some of the hackle. The straight, somewhat recessed blades on fly fishing nippers are designed work and cut in tight spaces. Most nippers designed for fly fishing also include another simple but highly useful feature – a small needle.

When a fly tyer finishes a fly, thread is knotted near the hook eye and coated with a thin, invisible cement. Well, in the world of fly tying, time is money and production fly tyers apply that cement quickly, often leaving an invisible layer in the hook eye. When it comes time for you to tie that fly on your line, you can’t get the tippet through the hook eye because it’s coated in glue. This happens even more frequently with hard-bodied poppers that might be dipped in paint, only it’s the paint that is coating the hook eye. The little needle on your

nippers is designed to clear that layer of cement or paint and preserve your sanity when attempting to attach a fly.

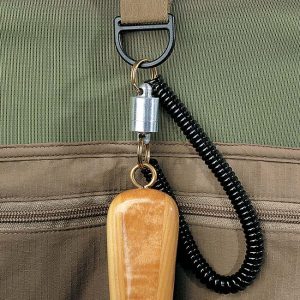
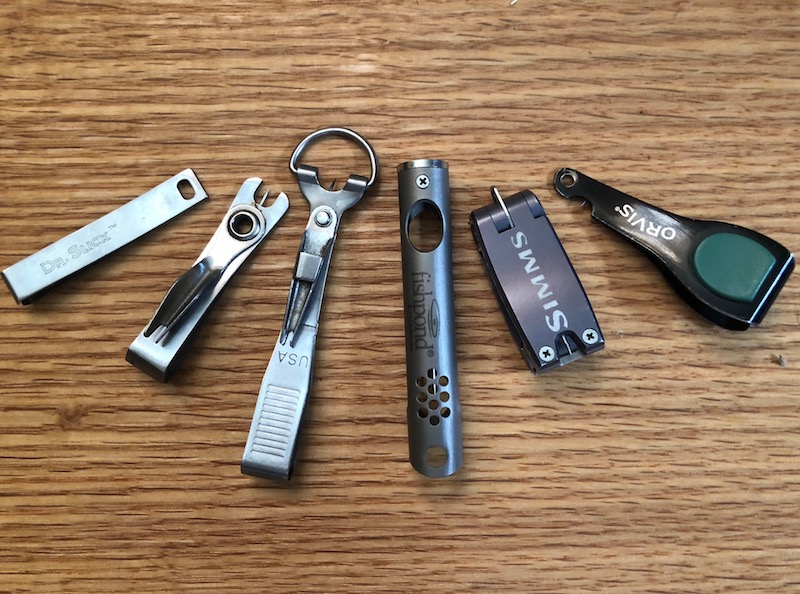
As with most any fly fishing product these days, there are seemingly endless nipper styles and features to suit your needs and tastes. Some are just shaped differently, boasting a better ergonomic design. Others are equipped with additional tools for tasks such as tying knots or sharpening hooks. And if you want to take it to the next level, check out this description of Abel’s nippers:

  • Designed, manufactured and assembled in the USA
  • Anodized 6061-T6 aluminum body construction
  • Replaceable jaws – machined out of premium grade Crucible CPM S35VN stainlesssteel, then heat treated to 58-60rc
  • Engineered to cut 7X – 100 lb mono and braid
  • Two Year limited warranty on the jaws after initial purchase
  • Pin – 316 stainless steel
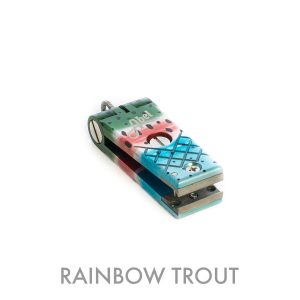
And they can be yours in black for a mere $85. For custom colors, they’re just $105. And with a cool fish print… a steal at $165. Yep, $165 for line cutters. All of a sudden, $10 for a pair of nippers doesn’t sound too bad, does it? As with anything else, if you have the disposable income and want to spend $165 of it on nippers, go ahead. I won’t judge you.