Spotting Fish

A 14″ rainbow feeding in flat, shallow water

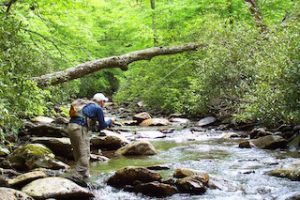
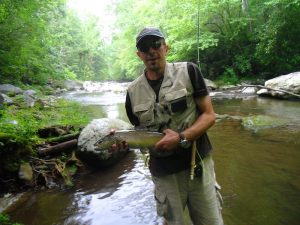
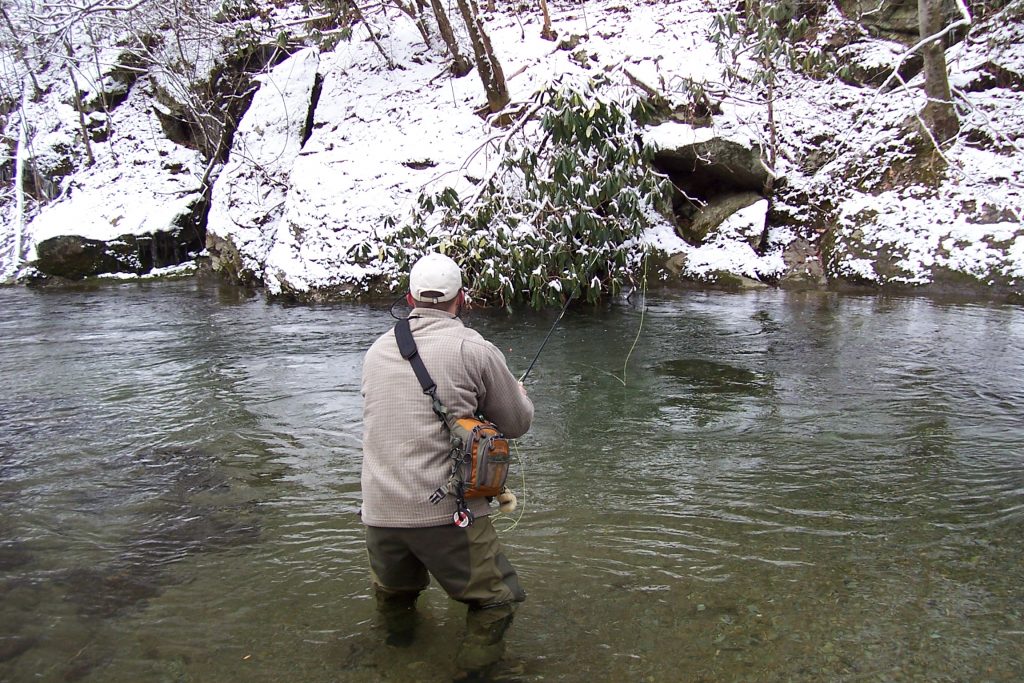
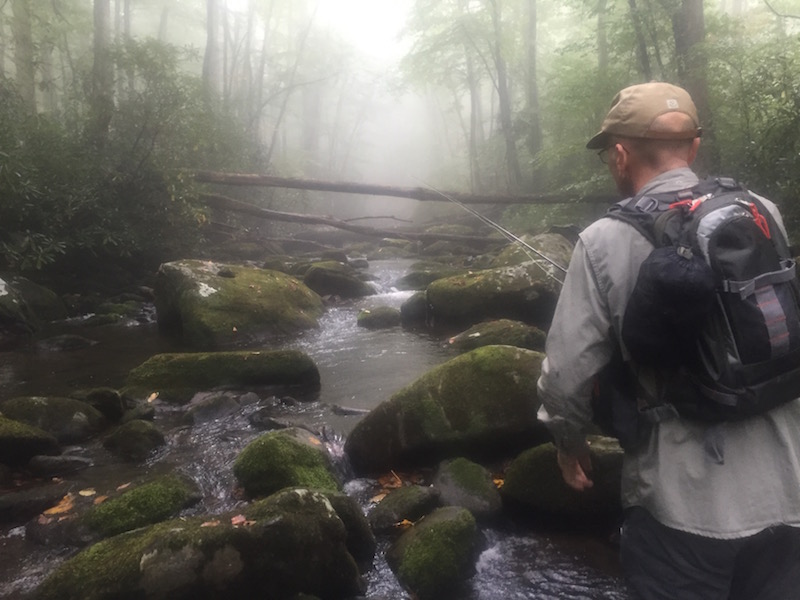
In some fly fishing scenarios, spotting fish is absolutely critical for success.  Fishing the saltwater flats for bonefish, redfish, tarpon, etc. or the freshwater mud flats for carp will provide little more than casting practice if you can’t see the fish.  In other scenarios, such as fishing a mountain trout stream, you can tell where fish should be by reading the water, and you can catch a lot of fish just by fishing likely spots.  But even when fishing trout streams, the ability to spot fish in the water can sometimes allow you to locate and target larger fish.  In the fall, this is particularly relevant in the Smokies as large brown trout begin moving into flatter, shallower water preparing to spawn.

Spotting fish can be difficult to learn and there is no substitute for years of experience and practice, but there are a few things that can help you get started.  The best place to start is with a pair of polarized sunglasses and this article will help a little when choosing a pair.  The next thing to understand is how trout see, because as you seek out vantage points from which to spot fish, you want to avoid spooking the fish in the process.  Here is an article on trout behavior that goes into a little more detail. Now we’re ready to go spot some fish.

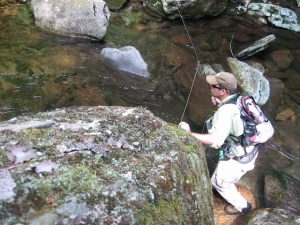
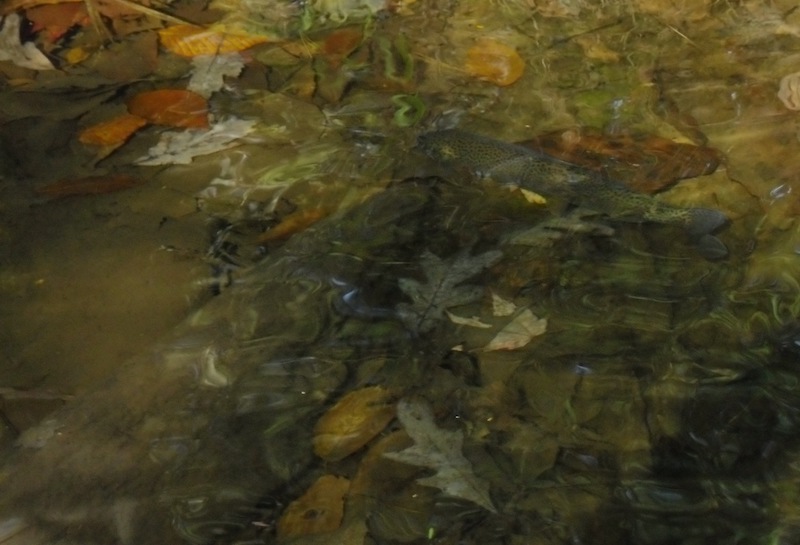
Start by looking for fish in slower water.  The more broken the surface is, the more difficult it will be to see through it. If possible, try to find a higher vantage point from which to look.  This will greatly reduce the amount of light refraction from the water’s surface.  Just remember that the higher up you get, the easier it will be for fish to pick up your movement.  Avoid standing erect on a large boulder, as your silhouette will be far more pronounced.  A high bank with a wooded backdrop is ideal, but you’ll still want to keep your movements slow and minimal.  If you are on a large rock above a pool, get on your belly and peek over the edge. Remember the old westerns where the Indians were looking off the rocky bluffs about to attack the wagon train? That’s the idea.

Now that you’re in position, take your time.  It’s extremely rare that you’re going to step up to a pool and immediately see a 27” brown trout.  You have to methodically scan the pool.  Start by reading the water and looking for fish where they should be.  Look for obvious feeding areas in and around current lanes and foam lines.  Look for areas with obvious cover under and around big rocks and/or fallen trees.  They blend in REALLY well, so look long and hard and train your eye to look through the water rather than at it.

It’s hard.  You’ll spot plenty of fish that turn out to be rocks or pieces of wood.  I once spent 15 minutes casting to a plastic grocery bag hung on an underwater limb. It had the exact shape and movement of a trout!  I was in the water and my buddy was above me, watching from a bridge.  We were both certain it was a fish!

There are four trout in this photo. Can you see them?

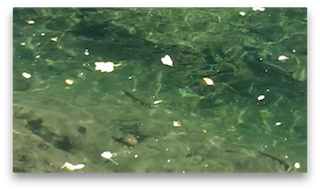
Movement and shape really are the best giveaways and that’s why it’s so important to take your time and give long looks to those likely spots.  You may not see anything at first, then you see a little movement and suddenly the fish is visible.  And once you spot one, you often begin to notice others around him.  Watching the actual stream bottom, especially on sunnier days, can be helpful too.  The movement that you often detect is the shadow of the fish.

Another thing to look for is a flash near the stream bottom.  The eyes of a trout are positioned in such a way that they look slightly upward.  When feeding on nymphs on the bottom, the trout has to angle his body to see below and will often “twist” his body when he eats the nymph.  When this occurs, his white belly reflects light and produces a flash.  This is always helpful when looking for fish, but especially in faster water.

All of this is easier the more familiar you are with the stream bottom.  If you have a favorite pool, maybe one where you spooked a big fish before, keep going back there and looking.  You will inevitably begin memorizing the stream bottom and will more quickly and easily be able to differentiate between rocks and fish. Again, it’s not easy and it takes time but like most things, the more you practice, the better you’ll get.

So, you’re starting to spot some fish… now what?  Don’t just jump in and start casting the second you see a nice one.  Keep watching.  What is the fish doing?  If you see a big fish just hugging the bottom, he’s not feeding and you’re wasting your time casting to him.  But good news… you found a big fish.  You might come back closer to dawn or dusk when he is more likely to be feeding.

This 22″ brown was spotted and observed for nearly 15 minutes before approach

If you spot a fish up in the water column, he’s likely feeding.  Keep watching him.  Is he looking up?  Does he consistently feed to his right?  Is he staying in one place or is he systematically rotating to different locations within the pool?  Pay attention to all of these things and then you can plan your attack.  Sometimes with big fish, you’re only going to get one shot and you want to make it count.

How much time you spend looking depends on you.  I know guys that do little more than target big brown trout, and they spend far more time watching water than they do fishing.  For me, it depends on where I’m fishing and the conditions.  If I’m fishing pocket water on a high country brook trout stream, I’m not going to spend much time, if any, looking for big fish. I’m going to cover a lot of water and hit the likely spots.  If I’m fishing a big pool on a brown trout river, I’m going to spend at least a few minutes looking before I jump in.  If I’m fishing that same big pool in late fall, I’m going to look a lot more thoroughly!

Two Fly Rigs

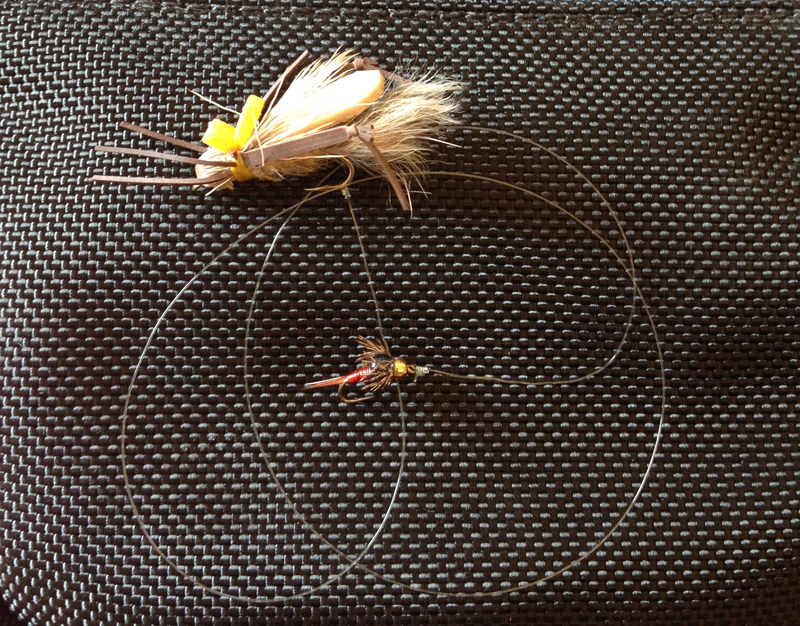
I almost always fish with two flies when I’m trout fishing. There are just so many advantages to it. Beside the obvious advantage of potentially offering two fly choices to the trout, it provides you the opportunity to simultaneously present a fly in two different feeding columns. Below, I’m going to talk about some of those strategies as well as a few different ways to rig a dropper system. As a bonus, you get to enjoy some of my horrific artwork!

Dry Fly / Dropper
This is the two-fly method with which many fly fishermen are most familiar. It seems that even less experienced fishermen will tell you this is how their guide rigged them up when they were fishing out west during hopper season. When you rig like this, you are typically tying on a larger, or at least more visible, dry fly and attaching a smaller nymph off the back of that dry fly. You’re covering the top of the water with the dry fly and you’re covering usually the middle water column (sometimes the bottom) with the nymph. The dry fly serves as sort of an edible strike indicator for the nymph.

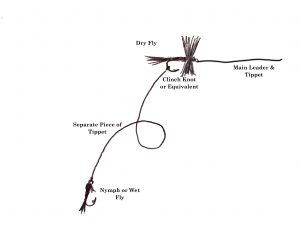
I typically rig this by tying my dry fly directly to the main leader and tippet. I’ll then take probably 18”-24” of tippet material and tie one end to the nymph, and the other to the bend of the hook on the dry fly. There are certainly a lot of variables, such as water depth or where you think the fish might be feeding, that determine how far apart you put the two flies, but the amount mentioned above is a pretty good “default setting.” I like to use a clinch knot to connect to the bend of the hook, but whatever knot you usually use to tie a fly on should work fine.

You want to make sure that the flies you select for this set-up compliment each other and are appropriate for the type of water you’re fishing. For example, a small parachute dry fly may not support the weight of a large, heavily weighted nymph. Parachute type patterns will easily support the weight of smaller, lighter nymphs, particularly in slower water. So, a #14 Parachute Adams with a #18 Zebra Midge dropper would be great for a tailwater or maybe a slower run or pool in the mountains. A #14 Parachute Adams with a #8 weighted Tellico nymph, fished in faster water is going to be trouble. Heavily hackled, bushy dry flies or foam dry flies are better choices when fishing in faster water or with heavier nymphs.

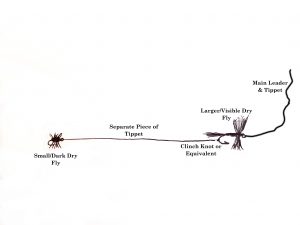
With that in mind, know that this method may not be suitable for every situation. For instance, if you need to get a nymph deep, particularly in a faster run, you’re going to need a lot of weight and using a dry fly–dropper rig is not going to be effective. You’re better off using traditional nymphing techniques for that. But for fishing hatch scenarios where fish are actively feeding on and just below the surface, or for fishing to opportunistic feeders in shallower pocket water, it’s pretty tough to beat.

I also like to fish this same rig with two dry fly flies. On many occasions, I’ve found myself in a situation where I have trouble seeing my dry fly – usually when trying to imitate something small or dark like a midge, Trico, or BWO. In those situations, I’ll often tie on a larger, more visible dry fly with the smaller, darker dry fly tied about 18” off the back. Sometimes, having the more visible fly as reference allows me to actually see the smaller fly. But if I still can’t see the smaller one, I know to set the hook if I see a rise anywhere within 18” of the visible fly.

Two Nymphs or Wet Flies
Just like the dry fly-dropper rig above, fishing with two nymphs or wets allows you to cover two different feeding columns. Only now, you’re typically covering the middle column and the bottom. I think another advantage with a two nymph rig is they tend to balance each other out and drift better.

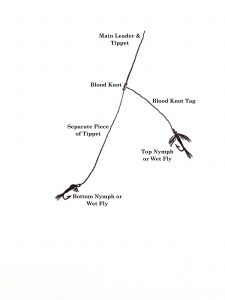
There are a few different ways to rig for this and there are numerous strategies for fly selection and placement. If I have a nymph pattern that the fish are really after, I will sometimes fish two of the exact same fly. There have even been a few occasions when I’ve caught two fish at once! But usually I’m searching and I’m trying to provide the fish with options, so I’ll most often have two different fly patterns.

Keep in mind that (most of the time) your lowest fly on the rig will be fished near the bottom while the higher fly will be fished more in the middle column. I try to select and position flies with that in mind. For example, it’s far less likely to find a stonefly in the middle of the water column. They’re going to be found near the stream bottom, so logically, I want my stonefly nymph to be the bottom fly of my two fly rig. On the other hand, an emerging mayfly is more likely to be found in the middle feeding column. So, a soft hackle wet fly would probably be most effective as the top fly on my nymph rig.

You can rig like this with totally different flies or you may decide to stay in the same “family.” If you’re in the middle of or expecting, say, a caddis hatch, you may rig with a caddis emerger as your top fly and a caddis larva as your bottom fly. I’ve also had a lot of success choosing one nymph to act purely as an attractor. I may tie on a larger or brighter nymph as my top fly and a smaller or subtler nymph as my bottom one. I think that very often, the brighter or bigger nymph gets their attention, but they eat the subtler nymph below it. I tend to fish the nymphs a little closer together in these situations.

You can rig a pair of nymphs the same way we mentioned above, by tying one directly off the hook bend of the other – referred to as the in-line method. This is probably the easiest way to rig and fish two nymphs. But some don’t like this method because they don’t think it allows the top fly to drift freely.

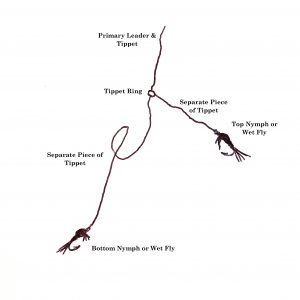
A common way to rig two nymphs that will allow the top fly to drift more freely, is to use a blood knot to attach a section of tippet to the end of your leader. When tying the knot, take care to leave one long tag end, to which you will tie the top fly. The bottom fly will be attached to the end of the new tippet section. This definitely allows the top fly to have more movement and it puts you in more direct contact with both nymphs. Though for me, this method results in a lot more tangles so I only use it for specific scenarios.

You can also rig quite similarly using a tippet ring (discussed in another article in this newsletter). With a tippet ring attached to the end of your leader, you tie one shorter piece of tippet to the ring, to which you will tie your top fly. And you tie a separate, longer piece of tippet to the ring, to which you’ll tie your bottom fly. This is a pretty simple way to do things but will also likely result in a few more tangles than the in-line method.

These are just examples of a few of the more common methods for fishing and rigging multiple flies. Play around with it and find what combos and techniques work best for you. Never be afraid to experiment!

Setting the Hook

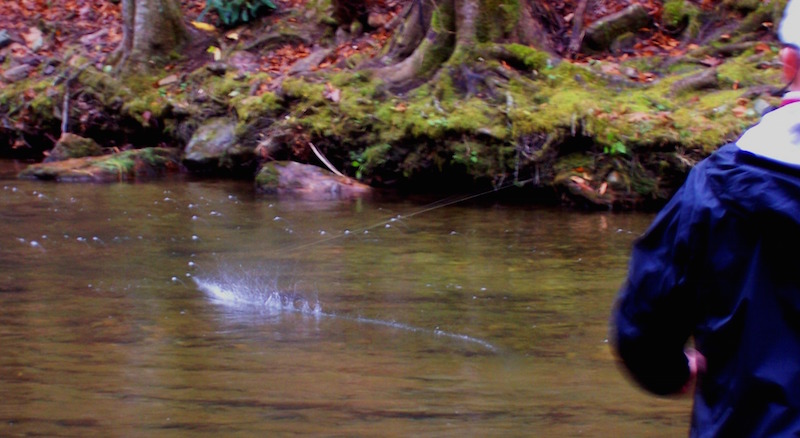
If you’ve ever spent anytime fishing in the Smokies, you have missed plenty of strikes. And if you’ve ever been fishing with me in the Smokies, you’ve no doubt heard me say that no matter how good you are and how often you fish, you’re going to miss strikes from these fish. I’d say that’s true most anywhere, but in the Smokies, it’s a guarantee. I’ve had the pleasure of fishing for trout all over the United States and I am yet to find trout anywhere that hit and spit a fly quicker than they do in the Smokies! But while nobody is going to hook them all, there are plenty of things you can do to increase the number of fish you hook.

Before we get into those things, let’s first talk about what exactly is going on when a trout hits your fly. I once guided a gentleman who was having an excellent day as far as activity goes, but he was missing A LOT of strikes. I was giving him plenty of tips along the way but midway through the day, I realized we just weren’t on the same page when, after missing another strike, he commented, “I don’t know how trout even survive.”

“What do you mean,” I asked.

He replied, “It seems like it would be hard for them to survive when they miss their food so often.”

I asked more emphatically this time, “What are you talking about?!?”

He said, “As often as they miss the fly, you know they’ve got to be missing the real food, too.”

I exclaimed, “They’re not missing. You are!”

Don’t get me wrong. I have missed plenty of strikes in my years of fly fishing. Like I said, we all do, but it’s always been my fault, not the trout’s! Sure, every now and then a fish will “short strike” the fly or bump it with his nose, but for most anglers, that is very much the exception.  Even when that is the case, it’s probably still your fault. If you’re getting short strikes, it’s probably because your fly is too big, or your tippet is too big, or you have drag… Again, all of those things happen to everyone, but blaming the fish will never fix any of them!

So, what actually happens when a fish hits your fly? It depends on the kind of fly you’re fishing. When you are fishing a streamer (a fly that imitates a baitfish or something else that swims), you are usually stripping it and keeping a tight line. Typically, the trout will chase and/or ambush something they think is a wounded or fleeing baitfish. The strike will usually be rather aggressive and because you have a tight line, you will feel the strike. When you’re swinging wet flies or straight-line nymphing, you usually feel the strike as well, but it’s usually more subtle than the often violent strike that comes on a streamer.

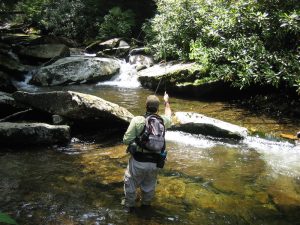
But most of the time on a trout stream, most fly fishermen are imitating aquatic insects that are drifting in the water column. Whether adults on the surface or nymphs below the surface, these bugs are drifting helplessly in the current. When trout feed on these natural insects, it’s not necessary or efficient for them to swim around ambushing them. Rather, a trout will position facing a current, where the insects will drift down his feeding lane. All he has to do is maneuver slightly up, down, or to the side to pick them off.   When a trout feeds in this manner, he’s more or less just moving in front of the bug and opening his mouth.

But there are a lot of things coming down the current and some of them, like small twigs or leaves, may look like an insect to a trout. When he takes one of these foreign objects by mistake, he immediately spits it back out. It’s what a trout does all day. Real bug = swallow, stream junk that looks like a bug = spit it out. When you drift an artificial fly down the current and the trout hits it, he immediately spits it out because it’s not real. So you have that split second between when he eats it and when he spits it to set the hook.

Wild trout, like in the Smokies, are highly instinctive and tend to make this decision pretty quickly. Stocked trout were raised in hatcheries where they were fed daily. They tend to “trust” food a little more and consequently, will hold on to a foreign object (like your fly) a little longer before spitting it out. For that reason, fishermen tend to have a better strike to hook-up ratio on stocked trout vs. wild trout.

In either case, you are rarely going to feel the strike in these scenarios. To avoid drag and present the fly naturally, you will have to have some slack in your line and the fish doesn’t have the fly long enough to tighten your line enough for you to feel it. You will need to visually recognize the strike to tell you when to set the hook. With a dry fly, it’s fairly obvious because the fish will have to break the surface to eat your fly. As soon as you see that, set the hook. It is incredibly difficult in most situations to see a fish eat your nymph, so we often use a strike indicator positioned on the leader. When the fish eats the nymph, it will move the indicator, providing your visual cue to set the hook.

Now, with all of this in mind, here are some tips that may help you connect on a few more fish, particularly when dead-drifting dry flies and nymphs.


  • Know that you will probably not feel the strike and trust the visual indication of the strike. Even when streamer fishing when you DO normally feel the strike, there are times when the fish hits between strips when the line is slack. You may not feel it but you’ll see the fly line dart forward. Trust what you see!
  • Expect a strike every time the fly is on the water and be ready. As silly as it sounds, many strikes are missed because the fisherman just isn’t paying attention. Stay focused on what you’re doing. Don’t look at the bird overhead. Don’t look at the next pool up the river. Don’t stand there with your hand on your hip. Be ready!
  • Similar to #2, pay attention to your slack. The cast isn’t when your job ends – it’s when it starts. Particularly when fishing upstream, be prepared to immediately begin collecting excess slack as it drifts back to you. Many fishermen think that they’re missing strikes because they’re too slow when, in fact, their reaction time is fine but they have too much slack to pick up to tighten on the fish. Leave just enough slack to achieve a good drift but no more.
  • Keep your casts as short as possible. Not only will you be more accurate and probably get more strikes, but you’ll have less line to move when setting the hook. In some situations, like slow pools, we are forced to make long casts, but fish from better, closer positions when possible.
  • Move the line. Your hook set should be like making a quick backcast. In other words, if you miss the strike, the line should go in the air behind you like a backcast. If you miss a strike and all of your line is still on the water in front of you, you didn’t move enough line to set the hook.
  • Your hook set should be quick but smooth, and when possible, in an upward motion. A snappy or jerky hook set is a good way to break a tippet. A downward hook setting motion has a tendency to pull the fly out of the fish’s mouth, rather than up through the lip.

Setting the hook is also very much a timing thing. The more time you spend on the water, the better your timing will be and you may find that you sometimes even anticipate the strike just before it happens. And you may find that you have to adjust the timing of your hook set on different rivers. For instance, you may need to slow down a little when fishing for stockers or you may have to speed up a little when fishing for wild trout.

In either case, you’re still going to miss some and that’s okay. As far as fishing problems go, missing strikes is a pretty good one. To miss strikes you have to get strikes. And if you’re getting strikes, you’re doing something right!

Active Nymphing – Rethinking the Dead Drift

I could write thousands and thousands of tortured words on how to nymph fish. There are countless methods and variables that can be determined by anything from water conditions to the type of nymph you are trying to imitate. Needless to say, it’s a little more than we can chew in a newsletter article but consider this an introduction to what I like to call active nymphing.

I differentiate it with the word “active” because mostly, we are taught to fish our nymph(s) on a dead drift. In other words, we try to get our nymph to drift at the same speed as the current, usually under a strike indicator, with no motion or “action” at all. In many situations, this is a highly effective method for catching trout and one that definitely shouldn’t be abandoned. But there are some situations when putting a little movement in the fly, “little” being the key word, may produce a few more fish.

If you’ve spent much time fishing nymphs, this has probably happened to you at some point. You dead-drift your nymph(s) under a strike indicator multiple times through a great run with no results. When you quit paying attention to do something else (probably change flies), the line and nymph(s) straightens downstream, dragging in the current, and a fish hits it.

Nymphs will sometimes deliberately “drift” to other parts of the stream in a sort of migration. Other times, nymphs may unintentionally become dislodged from a rock and find themselves drifting down the stream. In either case, they are most often not particularly good swimmers, and are basically at the mercy of the current. Your dead-drift nymphing technique is primarily designed to replicate common scenarios like this. However, some nymphs, like the Isonychias mentioned in the other article in this newsletter, ARE good swimmers, and they don’t drift helplessly with the current. Caddis especially tend to be good swimmers.

Soft Hackle Pheasant Tail

And at certain times, such as when it’s time to hatch, even poor swimming nymphs will uses gases to “propel” themselves through the water column to reach the surface. These nymphs are often referred to as emergers, and during these times, that upward, emerging motion of the nymph is often what triggers the fish to strike.   So, that fish you caught “by accident” when you let your line get tight and drag behind you may not have been such a fluke. When your drift ended and the line straightened, your nymph “swung” from the stream bottom to the surface, likely resembling an emerging nymph. The trick now, is to replicate that how and when you want to, rather than by accident when you’re not paying attention.

The best way to get started with this technique is by finding a good stretch of pocket water or a nice riffle with some deeper seams and cuts. With faster current, you’ll be able to get closer to the fish and employ a high-sticking method. Use a longer rod, probably 8-9’, and use a leader approximately the same length as the rod. Tie on a generic, all-purpose soft-hackle pattern, like a soft-hackle Pheasant Tail or Hares Ear, and put a small split shot about 8” above it. Forget the strike indicator.

In a smaller pocket, keep just a couple of feet of fly line out past the rod tip, and make a short cast up and across to the top of the pocket. You should be slightly more than a rod length away from your target, preferably with a faster current between you and the target (this will help to conceal you from the fish). Keep your rod tip up and out by extending your arm, and try to maintain an approximately 90-degree angle between the line and rod. By keeping your rod tip up, you can keep most of the leader off the water. If you want the nymph to go a little deeper, drop your rod a little lower. It depends on the depth of the water.

Move the rod with the drift at the pace of the current to maintain the 90-degree angle, and allow the drift to continue in front of and slightly below you. You may get a strike during this portion of the drift. If so, you’ll probably feel it since you have most of the slack out of your line, but keep a close eye on your leader. It will tighten if a fish strikes and be another cue for you to set the hook. When you reach the end of the drift (bottom of the pocket), quit moving the rod with the drift. This will force the fly to swing from the bottom to the surface. If the fish hits during this portion of the drift, you will likely feel a very hard tug.

You can use this same method when fishing a bigger pocket or a longer seam in a riffle. You may just be using slightly more line and have a little longer drift. You may also choose to try one more technique on these longer drifts. Do everything as described above, but when the fly and line are passing in front of you, give your wrist 3 or 4 intermittent, slight upward twitches.   This will allow the fly to “jump” or “pulse” in the current. Keep in mind that you want those wrist twitches to be very slight. Quickly and aggressively “pulling” the fly from the bottom to top will not look natural.

Girdle Bug

I suggested using a soft-hackle fly for this technique, mainly because the design of the fly lends itself well to the motion-based presentation, but I fish a variety of nymphs in this fashion. Definitely give it a try with your favorite caddis nymphs and emergers. And next time that water is a little high and stained from rain, give this a try with a dark Wooly Bugger or a dark, rubber-legged nymph like a Girdle Bug. You might be surprised at what you find!

More visible leaders with colored butt and mid sections can make this method of fishing  much easier.  They help a little with strike detection but mostly, they help you see and track the leader and better gauge the depth of the fly.  I make leaders specifically for these short-line techniques and they are available for purchase here.

Keeping Your Dry Fly Floating High

A buoyant Humpy dry fly

In April, dry fly fishing really starts to turn on in the Smokies. Not only are there a significant number of hatches, but water temperatures are getting ideal and fish are just looking up, even when no hatches are present. Presenting a dry fly that rides high on the water, not only tends to produce more strikes, it is much easier for you to see. Here are a few tips to keep your fly floating high in the fast moving currents of the Smoky Mountains.

First off, if you don’t tie your own flies, be sure buy high quality dry flies. It can be tempting to find Internet companies or box stores that offer really cheap prices on flies, but they are cheap for a reason. These dry flies often have less hackle and/or use a very low-grade hackle, and they are simply not going to float as well. Bushy, heavily hackled flies will float the best, as will flies that utilize foam and/or deer hair. These are all great for most of the riffles and pocket water you encounter in the Smokies. However, if you’re fishing to slow water risers in a slick pool, you may want to use a more slender, low profile fly like a parachute or comparadun pattern.

Treat your flies before you fish them. There are a number of great products on the market that accomplish this and are generically referred to as fly floatant. The most common are silicone based and have a gel consistency. Just squeeze a drop on your finger and rub it into your fly. Orvis, Aquel, Loon and Gink are probably the most common brands. They’re all probably about the same but everyone seems to have their favorite. I use Orvis Hy-Flote.

Fly Floatant

Once you’ve selected your high quality dry fly and gooped it up with fly floatant, the worst thing you can do to it is catch a fish! They take it under water and slime it up to the point where it doesn’t want to float as well, especially after you catch 2 or 3 fish. When this happens, a mistake a lot of anglers make is to re-apply the same gel floatant they used to pre-treat the fly. However, you’re often just trapping moisture in to the fly at this point. You need to remove as much of the moisture from the fly as possible.

On bigger rivers such as tailwaters, your false cast can keep a lot of moisture out of the fly, even after several fish. But in places like the Smokies, frequent false casting is often not an option due to the tighter quarters, and is often not desired because of the increased risk of spooking fish. There are a number of methods I use to dry a saturated fly in these environments.

Dry Shake

One is to press the fly against an absorbent material. Amadou is a material sold at many fly shops that works great for this. You can carry a patch on your vest or pack and just squeeze the fly in it. Chamois cloth is another good option. If you’re in a pinch and don’t have either, just press the fly against your shirt. After employing this method, blow on your fly. Finally, consider carrying a second, powder based floatation product. These are desiccants, similar to what’s found in the small, “do not eat” pouches packaged with some clothing and electronics. Again, there are numerous brands. Frog’s Fanny is a favorite of many anglers. My favorite is Shimazaki Dry-Shake. It has a large-mouthed bottle that allows you to drop the fly in while still attached to the tippet. Close the lid, shake vigorously and remove. It will be floating like new.

The final tip for keeping that fly floating high is technique. What causes flies to get waterlogged more than anything else, especially with novice anglers, is drag. When your fly doesn’t drift naturally with the current, and instead pulls unnaturally against the current, not only will you not catch many fish, your fly is going to become more waterlogged and require far more maintenance to keep it floating.

Think about what you’re doing. Instead of dragging the fly through the run 2 or 3 times before making a good drift, read the water. Identify the varied currents that will pull your line at a different speed than the fly and try to position yourself where you can eliminate them. If you can’t eliminate them through position, think about how, when, and which direction you’ll need to mend BEFORE you make the first cast. And pick your fly up when it reaches the end of the target area, rather than letting it drift (drag) into the fast shallow riffle at the bottom of the run.

Keeping the line off the current lip at the rear of the pool provides a drag free drift through the sweet spot

Experienced anglers often do most of this instinctively, so it looks like they’re just casually moving around casting. The good ones always make it looks easy! If you’re newer to fly fishing or even if you’ve done it awhile but only get out a few times a year, it won’t be instinctive and you’ll have to think about it. This is just good advice, period. If you execute a good cast and drift in the right place the first time, you’ll not only keep your fly floating better, you’ll catch more fish!

Finally, on a similar note, carry your fly in your hand when you move from spot to spot. I see a lot of people who will let their fly drag behind them in the water as they wade up to the next pocket or run. If you do this, the best-case scenario is that you’re going to waterlog your dry fly. More often than not, you’re also going to hang your fly up on every rock and stick in the river!

Winter Fishing in the Mountains

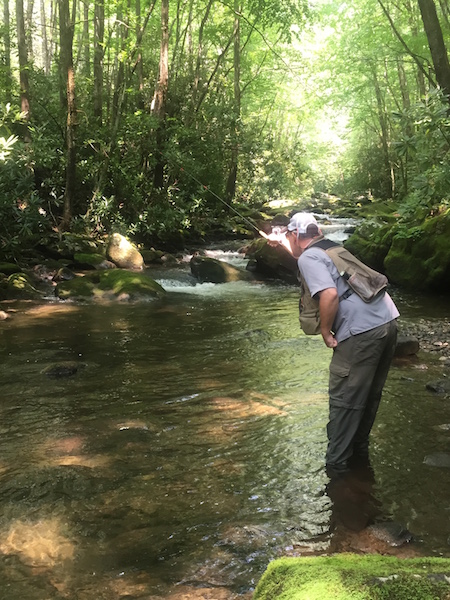
We’ve talked a lot about water temperature in many of these articles and for good reason. Things like approach, presentation, and fly selection can determine whether or not a fish will take your offering, but water temperature can determine whether or not a fish will take any offering! You can read in more detail about water temperature in A Matter of Degrees, but to keep it simple here, wild trout in the Smokies just don’t do a lot of feeding when the water temperature is in the 30’s and low 40’s.

Tailwaters are different because the water comes from the deep, insulated layer of a lake, and the water temperature remains relatively constant, regardless of air temperature. Stocked trout in a freestone stream are different because, well, they just don’t know any better. They were raised in hatcheries and were fed the same amount of food every day, regardless of temperature. But wild trout in freestone streams have never had that luxury, and in order to survive, their metabolism changes and they become nearly dormant. This doesn’t mean that they won’t feed at all but if you’re going to fish the Smokies in the winter, come prepared with a great deal of patience.

I spend more time looking this time of year than I do actually fishing. Blind fishing a run in the spring can be very productive because all or most of the fish should be feeding and they’ll often move up and down and side to side for food. In the winter they typically won’t move much for food and you need to put the fly right on their nose. To do this most effectively, you really need to see the fish. Take your time and watch the water, paying particular attention to the slower currents on the edges and lower parts of a run. Ideally, you want to locate fish that are up in the water column rather than hugging the bottom. Fish that are up a little in the column are more likely to be feeding.

If you can’t actually see the fish, look for flashes on the bottom. Any fish that is feeding will likely be picking nymphs off the bottom. When a trout eats a nymph off the bottom, they usually “tilt” their bodies sideways and you’ll see the flash of their lighter colored bellies. You may have to scope out several pools or runs before you see fish or fish activity. Experience will teach you the kind of water to focus on, but deeper, slower runs will usually produce better than fast riffles and pocket water this time of year. And try to pick the warmest part of the day, probably late morning to late afternoon.

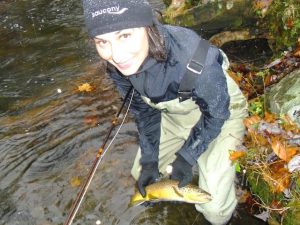
Once you think you’ve located feeding fish, it’s time to think about fly selection. On warmer winter days, you may actually see some insects hatching. If you do, they’re likely to be small and dark: Blue Wing Olive mayflies, small black stoneflies or caddis, dark olive or black midges… Rarely anything bigger than a #18. On rare occasions, you may see fish feeding on the surface during one of these hatches. Small Parachute Adams or Griffith’s Gnats are a pretty good bet in those instances. Mostly though, they’re going to feed more on the nymphs, so black Zebra Midges, small Pheasant Tails, and small black or olive Hare’s Ears will be pretty good bets.

If I don’t see any kind of hatch, I may still try one of the above mentioned nymphs, but more likely I’m going with something big, like a stonefly nymph. It may be more psychological, but I feel like I’ll more likely get that lethargic fish to eat if I show him a bigger mouthful. Girdle Bugs, black Wooly Buggers, Yuk Bugs, and Bitch Creek Nymphs in sizes #10 – # 4 are personal favorites.

Girdle Bugs

Regardless of your nymph selection, you’re going to want it to drift as slowly and as near the bottom as possible. I like to use heavy flies and I like to use split shot. Take your time and adjust your weight regularly as you move to areas with different depths and current speeds. If you’re not hanging up on the bottom from time to time, you’re not deep enough. If you’re hanging the bottom every time, you’re too deep. Take the time to get it right. That fly needs to be right in their nose!

Adjusting your strike indicator (if you’re using one) can help too, but usually the answer is more weight. Most fishermen just don’t have their nymphs deep enough in the winter. A great way to learn about the effects of different current speeds vs. the amount of weight on your line is to spend some time fishing a fly you can see under water.  For instance, tie on a bright pink egg and watch how deep it sinks, how fast it sinks, and how it drifts with no weight, then 1 spit shot, then 2 split shot, etc. Try it with a strike indicator and without to learn how the indicator can impact the drift, too. This is just a great way in general to better understand nymphing, and sometimes you’ll even catch a fish on that trashy pink egg!

Again, don’t expect near the number of strikes that you might in spring. But if you’re just itching to get out of the house and are willing to be patient, you might just be surprised at what you find.

Legends of the Fall – Hunting Brown Trout

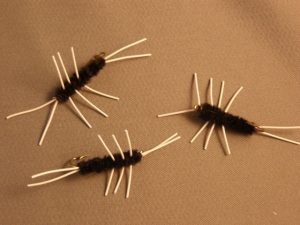
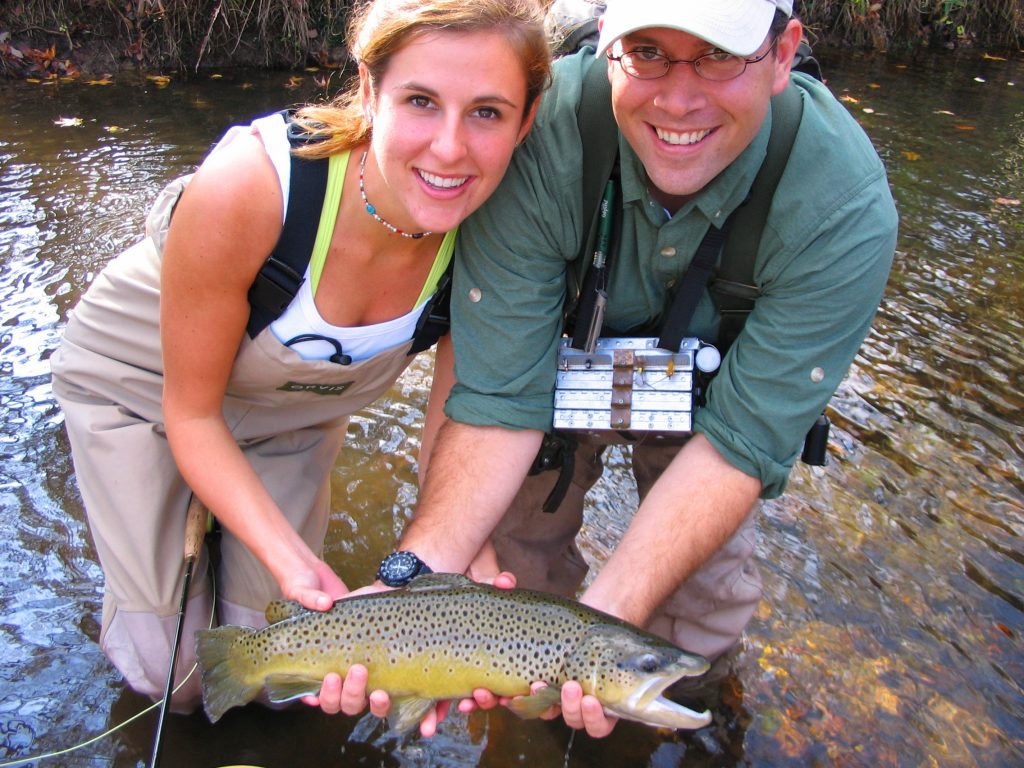
It’s the time of year when certain folks seem to be whispering more at the fly shop. They’re isolated in corners and peeking over their shoulders before saying too much. They’re talking about brown trout. Big ones. Somebody mentioned seeing a decent one around Metcalf Bottoms – about 18-inches. A younger guy innocently asked, “Since when did we start referring to 18-inch browns as ‘decent’?” The older guy replied with a grin, “October.”

The Smoky Mountains is largely thought of as a fly fishing destination where the appeal is to catch wild trout in a beautiful place. But as a whole, you don’t expect to catch particularly big trout. After all, rainbows rarely exceed 15-inches and brook trout rarely get any bigger than 10-inches in the Smokies. They’re both almost exclusively bug eaters, and after 3-5 years, they simply can’t support their weight with the bugs available, and they die. But when brown trout reach about 8 or 9-inches, they begin eating minnows, and crayfish, and mice, and birds, and small rainbows. They live 10-15 years and reach lengths of 30-inches in the Smokies!

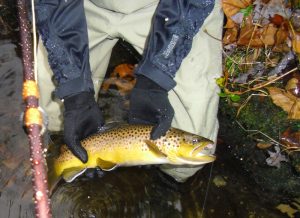
Fish that size don’t get caught often. Brown trout only live in a handful of rivers in the Smokies to begin with. They’re extremely cagey and for much of the year, they do most of their feeding at night – it’s illegal to fish the park at night. So, outside of the occasional big brown caught at dusk, or dawn, or after a good rain, we don’t get a lot of good shots at these guys. Until late fall.

Brown trout tend to make their spawning runs after the fall foliage has turned colors but before the last leaves have fallen. In the Smokies, that’s usually late October or early November. They typically move to shallower, more visible areas of the stream and are spotted by far more fishermen then. When they’re actually on the nest (or redd), we leave them alone. Not only is it just bad ethics, but they have other things on their mind than food at that time. But in the weeks leading up to the spawn and in the weeks to follow, their appetites are enormous!

In the weeks leading up to the spawn, they’re on the move searching for suitable nesting areas, often where they were originally hatched. This is when many fishermen are hoping to get their shot at a trophy. A number of folks have booked me during this time, thinking a seasoned fly fishing guide will be their ticket to success. While I can certainly help locate the fish, there is a whole lot that has to go right to catch him. It’s not just having the right fly at some secret honey hole!

Most people aren’t willing to put in the time it takes to catch one of these fish. Unless you’re just going to depend on luck, you have to trade fishing time for looking time. You may not spot one at the first place, or second or third… And once you do spot one, you’re not done looking. You have to watch him for a while to figure out his pattern: how he’s feeding, where he’s feeding, when he’s feeding, IF he’s feeding. You then may have to spend a pain-staking amount of time sneaking into a position where you can cast to him without spooking him.

Assuming everything has gone your way up to this point, you may only have one shot at him and a bad cast will kill the deal. And if he does eat and you do hook him, you’re problems have just begun. Now you have to fight a 25-inch trout in the fast, rocky waters of the Smokies! But it’s all worth it when it does come together and you become one of the lucky few. It’s the stuff legends are made of.

Skills: Fishing High Water

The Smoky Mountains are known for receiving large amounts of rain in a season and when it comes in bunches, the result can be swollen, rough, intimidating, and dangerous streams and rivers. Good and bad things occur when the water rises in mountain streams. On the down side, the streams become much more dangerous and sometimes impossible to wade. The faster current also makes it more difficult to control your drift. On the up side, a lot of food gets churned up in the stream, and that factor, combined with a level of comfort and security in stained water, often results in more reckless feeding by some of the bigger trout on the block. There are brown trout exceeding 20” in many mountain streams that don’t get caught often, but when they do, it’s usually when the water is up and off color.

The stream is going to look completely different under these conditions and it will help if you have intimate familiarity with the stream under normal flows. Regardless of how well you know the water, always use extreme caution under these conditions and don’t try any heroic stream crossings. One wrong step can quickly get you in big trouble! In fact, it’s not a bad idea to wear a life vest when fishing under these conditions. Better safe than sorry!

Forget about finesse. You’re not going to coax rainbows to #16 dry flies with delicate casts. Bring a long rod for a heavier line – maybe a 9’ 6 weight – and plan on chucking large, heavy nymphs with a rosary of split shot and no strike indicator. Casting is going to simply involve one flip behind you, wait for the tug on the rod tip, and chuck it forward with an open loop. Long casts are not necessary and will be less effective.

Instead, wade the edges and look for slower seams on the edge of fast currents and eddies behind rocks. Position yourself as close to the feeding zone as you safely can and use the length of the rod to reach and hold your flies in position. Keep the rod tip up and try to keep as much of the fly line off the water as possible, allowing for a much slower, more controlled drift. Follow the flies with the rod tip as they drift through the feeding lane and keep an eye on the fly line between the rod tip and water. You may feel a strike since you’re working with such a short line but most likely you’ll determine the strike when you see the fly line pull down or hesitate. If anything suspicious like this occurs, set the hook! With practice you’ll soon be able to differentiate between fish and rocks.

Don’t expect to catch large quantities of fish under these circumstances. It will be tough fishing to say the least. But if you stick with it, the rewards can be enormous!

Skills: Fly Fishing the Surf

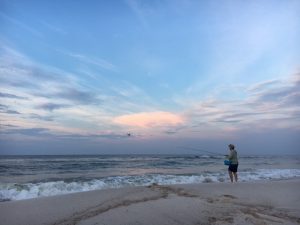
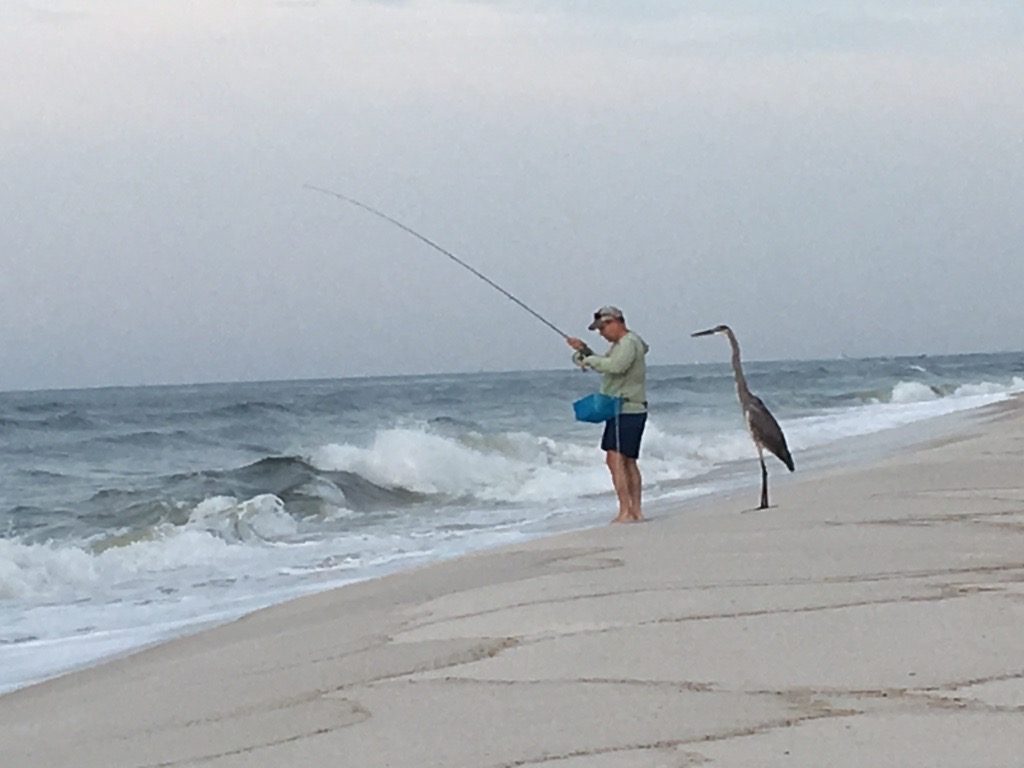
Every time I go to the beach on vacation, I take a fly rod with me. Sometimes I already have plans to do some flats fishing with a guide but just as often, my only plan is to get up early each morning and cast around in the surf to see what might bite. That’s one of the neat things about fishing in the ocean. You never know just what you might find!

I’ve been doing this for years. Some years it’s really productive and other years not so much. It is fishing after all. The one thing that is a constant is the strange looks I get from other people on the beach – strange looks that often lead to questions. And they are typically not questions aimed at gaining knowledge, rather to find out exactly what kind of idiot I am.

On this last trip I was approached by a kid who asked, “Did you catch anything?”

“Yes,” I replied. “I caught quite a few.”

“Wait, really? You actually caught fish? On a fly rod?”

I gathered that part of his dismay was because he’d been fishing the beach himself with no luck. But he was most especially shocked that I’d been catching them on a fly. Despite the fairly well publicized evolution of fly fishing, much of the world still makes the assumption that fly fishing is something that is done in streams for trout. Nothing more.

If you are under that same assumption, let me assure you that you can catch anything that swims on a fly rod. Your only real limitation is depth. In other words, deep-sea fishing with a fly rod, while it can be done, is hardly a practical undertaking. However, fishing the saltwater flats with a fly rod is not only productive and fun, but has been a popular pursuit for decades. Fly fishing the surf sort of falls into that middle ground of practicality. It’s definitely a challenge, but with the right technique, can be very productive. And if you’re going to the beach anyway…

If you’ve ever considered surf fishing with a fly rod, you’re going to need a few things. Unless you just know of specific fish feeding in the surf that require heavier tackle, a rod outfit in the 8-10 weight range should take care of most situations.  Unlike freshwater set-ups, your reel is probably the most important component of your saltwater outfit. Not only do you want something more resistant to corrosion, but something with a significant drag system. Even the smallest of saltwater fish can run hard and fast, and a cheap reel will at best result in a lot of lost fish. Really cheap reels with plastic parts may even “melt” on you!

Leaders should be in the 9’ range and at least a 10lb. test. Most of the time when fishing the surf, you’re casting larger flies in water that doesn’t have a lot of clarity, so fine tippets are not needed. In fact, many saltwater species are rather “toothy” and can cut through traditional monofilament. You may want to consider adding metal bite guards or using wire leaders and/or tippet.

For fly selection, I typically keep it simple and use multi-purpose baitfish patterns. Clouser Minnows and Lefty’s Deceivers in a variety of colors will take care of most situations. It never hurts to have a few crab patterns as well. If the area you’re fishing has a specific fly fishing shop nearby (most don’t), you can probably get some good fly recommendations there.

Homemade Stripping Basket

One of the most important things you’ll need is a stripping basket. I learned this the hard way on my first surf fishing experience. Most of the flies you’ll be fishing will be some sort of streamer, which means you’ll be stripping a lot of line. Unlike stream fishing, the line you strip will not rest neatly by your side when you strip it. Rather, the surf takes that slack line quickly in toward the shore, then out toward the sea, repeatedly. Not only will this cause big problems when you hook up, but the line routinely just wraps around your legs.

Stripping baskets can be purchased from most fly fishing suppliers or you can make your own. See the companion article “Stripping Baskets” in this newsletter to learn how. It’s cheap and easy!

Now that you have all of the right stuff, it’s time to talk tactics. Effectively fishing the surf is going to require as much observation as anything. If you just stand on the beach and repeatedly cast to the ocean, you’re going to end up with gobs of slack line when the tide rushes it back to you, you’ll wear yourself out, and you likely won’t catch many fish. Watch the water first.

The first thing to look for is feeding fish. If you can find schools of baitfish breaking the water, there’s something bigger chasing them. If you find a lot of this going on, you should have a really good day! Also watch for birds gathering over a certain piece of water. They’re looking for the same thing you are and they have a much better view. Typically, when you find the birds you find the fish.

Whether you can visibly see fish feeding or you’re simply casting blind, you want to time your casts. If you’re randomly casting into breaking waves, you’re probably not putting the fly in front of the fish and even if you do, you likely won’t be able to detect a strike due to excess slack created by the breaking wave. Fish will normally feed in the calm water just behind the breaking wave. In rough surf, these can be very short windows. In calm surf, they can be long windows.

In either case, waves tend to break in consistent patterns. Watch them. The waves may break in threes with calm water behind them. Or they may break may break in fives with calm water behind them. Take the time to learn the pattern. When you have it figured out you can time your casts accordingly to place and strip the fly behind the final wave in each series. And working at an angle, casting and stripping almost parallel to the breaking wave, will keep your fly in the prime target area for the most amount of time.

Fishing at Sunrise

The best time to fish the surf will certainly be when the surf is most calm. However, unless you’re at a private or sparsely populated beach, you’re best time is going to be from sunrise until 8 or 9am. That’s about the time when folks begin walking the beach looking for seashells and what not, and I can assure you that they will pay no attention to you. Since that fly line goes about as far behind you as in front of you, the chances of putting a Clouser Minnow into the lip of a passing beachcomber are high! Of course, when you get into late morning and afternoon, you add swimmers to the list of obstacles.

But that makes it perfect when you’re on a family vacation. Get up early and fish a couple of hours, then spend the rest of the day with your spouse or kids. Give it a try on your next beach trip and don’t give up if you strike out the first time. Like most other types of fly fishing, you have to suffer through some failure before things start to click. But when it clicks, it is all kinds of fun! Oh, and don’t forget that saltwater can really trash your gear, even the good stuff. Be sure to thoroughly rinse all of your gear after each outing.

Skills: 10 Tips for Fishing Small Streams

As many of you know, I spend nearly 200 days a year fishing and guiding on small mountain streams in the Smoky Mountains where creel surveys indicate that approximately 90% of (unguided) fishermen never catch a fish. Meanwhile, the 10% who do catch fish tend to catch A LOT of them. When fishing small streams, it’s a fine line between getting skunked and catching 50, and most of the time, the difference isn’t what’s in your fly box. In the Smokies and other similar small mountain streams, approach and presentation is the name of the game and to have success, you may need to adjust a few of your techniques. Listed below are 10 tips that may make your next small stream fishing trip more productive.

Dress for Success: As simple as it sounds, one of the biggest keys to being successful is not spooking the fish. There are a number of ways you can spook a trout but it all starts with what you wear. Leave the coral casting shirts at home. Instead, dress in earth tones like olive, tan, and grey. You don’t need to be a fly fishing commando with face paint and twigs in your hat but you do need to blend in.

This doesn’t matter as much on big, open rivers because you’re usually casting farther and your backdrop is the sky. On small mountain streams, you’re closer to the fish and your backdrop is usually trees, bushes, and rocks. Brighter colors stand out against that backdrop and allow the trout to more easily detect your movement.

Wade Quietly: Think Great Blue Heron and not Labrador Retriever when you’re moving through the stream. Step slowly, quietly, and try not to drag your legs through the water. Again, you’re closer to the fish in these streams and the fish are going to be sensitive to splashes and rocks scraping together. For this same reason, I don’t encourage wearing studded wading boots on these streams.

Move Upstream: Trout are going to be facing upstream watching a current for food. By moving upstream, you will be staying behind the fish making it more difficult for it to detect you.

Use Things Like Boulders to Hide Behind

Stay Low: A trout has a cone of vision that allows it to see things above it. The closer and higher up you are, the more the fish will be able to visually detect your movements. As before, you don’t have to be a fly fishing commando and belly crawl from spot to spot. Just try to crouch more when approaching a run and take advantage of natural barriers. For example, if there’s a boulder in the water, stay behind it rather than standing on it.

Read the Water: Trout won’t be just anywhere in the stream. Aimlessly casting your fly around the creek is not only unproductive, you risk spooking the good spots by throwing your line across them. Most of what you’ll find in small mountain streams is pocket water, which is just faster water interspersed with large rocks. Almost everywhere a current breaks over or around a rock creates a holding area for a trout, usually on the edges of the current and directly above and below the rock.

Look Before You Leap

Reading water becomes very instinctive with a little experience, but at first, you’ll have to think about it a little more. Look at each spot you’re approaching and consider that trout need three basic things: food, cover, and comfort. Food is typically going to be concentrated more in the currents rather than in still water. Cover is typically going to be found in deeper water and/or under things like rocks. Comfort is going to be found in places that don’t stress the fish, like slower currents rather than turbulent white water, or shade rather than sun on a bright, warm day.

Position First, Cast Second: Making a good presentation is the other biggest key to success on small streams, and one of the most challenging. Many anglers mistakenly stay too far back from their target and cast way too much line. In smaller mountain streams, you typically have a fairly large volume of water moving downhill through a narrow area. Everyplace the water breaks around a rock creates a velocity change, resulting in dozens of different current speeds. Making long casts puts line across all of these currents and creates drag on the fly. Drag on the fly means you don’t catch fish.

Attempting to overcome this exclusively by mending line is often impractical not only because of the numerous varied currents, but you simply don’t have time to do that much mending when casting to such small target areas. Your best course of action in pocket water is usually to get closer to the target where you can keep most of the line and leader off the water, often eliminating the need to mend altogether. At the very least, it will be easier to mend a short length of line on one current than a long length of line on five currents.

To get closer and keep from spooking fish, the idea is to keep something between you and the fish, like a boulder or simply a fast current. If you want to drift a fly on the inside edge of a current, you’re going to approach from the lower outside of the current, using that current to conceal you from the fish on the other side. Try to get close enough to use the length of your arm and rod to reach across the current and keep line completely off of the faster water. A longer rod will be beneficial because it’s going to give you more reach, allowing you to stay back a little farther. Of course, utilizing steps 1-4 are critical to making this work.

As you move up the stream, you’re constantly repositioning yourself for the next spot. Sometimes you’re repositioning yourself within the same pocket by fishing the near current first, moving closer, then fishing the far current. Remember, it has nothing to do with how far you can cast. Rather, it’s where you need to be to control line for the best drift. In pocket water, I’d estimate that 80% of the fish I catch are with less than 4’ of fly line past the rod tip.

When you come to a bigger, slower pool, you may not be able to get as close because you don’t have the faster currents to hide you. You also don’t have the faster currents to screw up your drift. Stay back and make slightly longer casts here. Just be careful not to make long casts to the head of the pool before fishing the tail or you can spook half the fish by lining them. Everything gets broken into pieces here. Whatever you’re going to spook first, fish first.

Minimize False Casting: Or just don’t do it at all. Most of the time when fishing small streams, you’re making very short casts, and in pocket water you’re often using a fixed amount of line. Repeated false casting is unnecessary and is movement above the fish. Wild mountain trout are in the middle of the food chain and they typically associate movement above them with a kingfisher or heron swooping down to eat them.

Position Carefully and Use a Longer Rod for Reach

Use a Longer Rod: There’s a common misconception that you need to have a short rod to fish small streams to stay out of the trees. Again, the idea here is not to make the longest cast possible up the stream without hanging a tree limb. You want to move closer, make short casts, and reach to keep line off of currents. A longer rod will better allow you to do that and I like to fish as long a rod as I can get away with. In the tiniest, rhododendron-choked mountain streams, that may only be 7’, but for typical mountain streams in the Smokies, it’s 8 ½’ – 9’. And yes, even longer tenkara rods can be highly effective for fishing this type of water.

Accuracy is Everything: All of the best small stream fly fishermen I can think of have two things in common. They know exactly where to position themselves before making a cast, and they are great casters. Unfortunately, great casting is often associated with double-hauling 110’ of line, and that’s hardly what I’m talking about. These fishermen aren’t making long casts, but can put the fly exactly where they want it the first time, the second time, and every time. In pocket water, if your first two casts are off target and/or drag a little bit, you still might catch a fish on the third cast, but you’ve probably already spooked the big fish of the hole.

If you’re not one to practice casting in the backyard, you should be. If you are, don’t just try to cast it as far as you can. Instead, practice with 20’ of line and less and try to hit a small target. Try to do it with an overhead cast off both sides of your body. Try to do it side arm. Try to do it with a roll or circle cast. You’ll find that the more you practice off the water, the “luckier” you’ll be on the water.

Keep Moving: In small streams, especially in pocket water, you’re going to catch more fish by covering more stream. Identify the likely spots in a pocket or run, put a half dozen drifts in each spot and catch your fish. If you miss a couple of strikes, put a few more drifts through and move on. If you don’t get a strike, don’t spend an hour there changing flies until you do. Move on. This doesn’t mean speed fish the stream, as you still need to be methodical in your approach. But when you get good at reading water, positioning and casting accuracy, you’ll be able to cover the water quickly and efficiently.